Thursday 13 August 2015

HB Blog 90: How To Implement SwipeMenuListView Android Library???

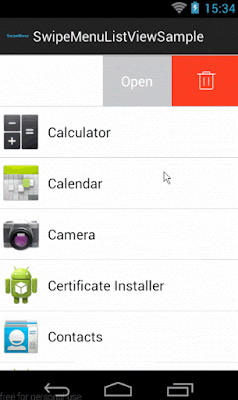
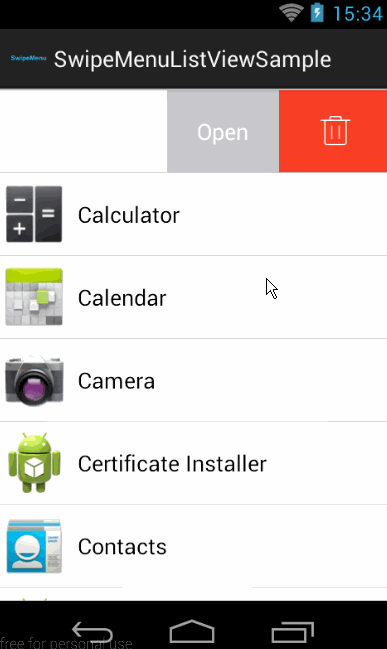
In this post, I will show how to implement SwipeMenuListView library. Basically, in iOS there is default option to manage actions while swipe the listview or will put as tableview cell. Similar, funtionality can be implemented in Android using SwipeMenuListView library.

Step 1 :- Add dependency.

Step 2 :- Add SwipeMenuListView in layout xml.

Step 3 :- Create a SwipeMenuCreator to add items.

Step 4 :- Add listener item click event.

Step 5 :-
Decide swipe direction.


Refer the below link for complete sample code:-
Download Sample Code
Download Apk File
Download Support Library
Have a look on few code snippets,
MainActivity.java
  1
  2
  3
  4
  5
  6
  7
  8
  9
 10
 11
 12
 13
 14
 15
 16
 17
 18
 19
 20
 21
 22
 23
 24
 25
 26
 27
 28
 29
 30
 31
 32
 33
 34
 35
 36
 37
 38
 39
 40
 41
 42
 43
 44
 45
 46
 47
 48
 49
 50
 51
 52
 53
 54
 55
 56
 57
 58
 59
 60
 61
 62
 63
 64
 65
 66
 67
 68
 69
 70
 71
 72
 73
 74
 75
 76
 77
 78
 79
 80
 81
 82
 83
 84
 85
 86
 87
 88
 89
 90
 91
 92
 93
 94
 95
 96
 97
 98
 99
100
101
102
103
104
105
106
107
108
109
110
111
112
113
114
115
116
117
118
119
120
121
122
123
124
125
126
127
128
129
130
131
132
133
134
135
136
137
138
139
140
141
142
143
144
145
146
147
148
149
150
151
152
153
154
155
156
157
158
159
160
161
162
163
164
165
166
167
168
169
170
171
172
173
174
175
176
177
178
179
180
181
182
183
184
185
186
187
188
189
190
191
192
193
194
195
196
197
198
199
package com.swipemenulistview_as;

import android.app.Activity;
import android.content.Context;
import android.graphics.Color;
import android.graphics.drawable.ColorDrawable;
import android.os.Bundle;
import android.view.LayoutInflater;
import android.view.View;
import android.view.ViewGroup;
import android.widget.BaseAdapter;
import android.widget.TextView;
import android.widget.Toast;
import java.util.ArrayList;
import java.util.Arrays;
import swipemenulistview.SwipeMenu;
import swipemenulistview.SwipeMenuCreator;
import swipemenulistview.SwipeMenuItem;
import swipemenulistview.SwipeMenuListView;

/**
 * This class is used for showing swipemenulistview.
 */
public class MainActivity extends Activity {

    private String[] arrData = {
            "Harshal Benake 0",
            "Harshal Benake 1",
            "Harshal Benake 2",
            "Harshal Benake 3",
            "Harshal Benake 4",
            "Harshal Benake 5",
            "Harshal Benake 6",
            "Harshal Benake 7",
            "Harshal Benake 8",
            "Harshal Benake 9",
            "Harshal Benake 10"
    };

    @Override
    protected void onCreate(Bundle savedInstanceState) {
        super.onCreate(savedInstanceState);
        setContentView(R.layout.activity_main);

        SwipeMenuListView swipeMenuListView = (SwipeMenuListView) findViewById(R.id.listView);

        SwipeMenuCreator creator = new SwipeMenuCreator() {

            @Override
            public void create(SwipeMenu menu) {
                // create "item1"
                SwipeMenuItem item1 = new SwipeMenuItem(getApplicationContext());
                // set item background
                item1.setBackground(new ColorDrawable(Color.parseColor("#FF9933")));
                // set item width
                item1.setWidth(100);

                // set item title
                item1.setTitle("Item 1");
                // set item title fontsize
                item1.setTitleSize(18);
                // set item title font color
                item1.setTitleColor(Color.WHITE);
                // set a icon
              //  item1.setIcon(R.drawable.ic_launcher);
                // add to menu
                menu.addMenuItem(item1);

                // create "item2"
                SwipeMenuItem item2 = new SwipeMenuItem(getApplicationContext());
                // set item background
                item2.setBackground(new ColorDrawable(Color.WHITE));
                // set item width
                item2.setWidth(100);
                // set a icon
                item2.setIcon(R.drawable.ic_launcher);
                // add to menu
                menu.addMenuItem(item2);

                // create "item3"
                SwipeMenuItem item3 = new SwipeMenuItem(getApplicationContext());
                // set item background
                item3.setBackground(new ColorDrawable(Color.parseColor("#138808")));
                // set item width
                item3.setWidth(100);
                // set a icon
                //item3.setIcon(R.drawable.ic_launcher);
                // set item title
                item3.setTitle("Item 3");
                // set item title fontsize
                item3.setTitleSize(18);
                // set item title font color
                item3.setTitleColor(Color.WHITE);
                // add to menu
                menu.addMenuItem(item3);
            }
        };

        // set creator
        swipeMenuListView.setMenuCreator(creator);

        swipeMenuListView.setOnMenuItemClickListener(new SwipeMenuListView.OnMenuItemClickListener() {
            @Override
            public boolean onMenuItemClick(int position, SwipeMenu menu, int index) {
                switch (index) {
                    case 0:
                        Toast.makeText(MainActivity.this, "Item 1 pressed", Toast.LENGTH_SHORT).show();
                        break;
                    case 1:
                        Toast.makeText(MainActivity.this, "Item 2 pressed", Toast.LENGTH_SHORT).show();
                        break;
                    case 2:
                        Toast.makeText(MainActivity.this, "Item 3 pressed", Toast.LENGTH_SHORT).show();
                        break;
                }
                // false : close the menu; true : not close the menu
                return false;
            }
        });

        // Right
       // swipeMenuListView.setSwipeDirection(SwipeMenuListView.DIRECTION_RIGHT);

        // Left
        swipeMenuListView.setSwipeDirection(SwipeMenuListView.DIRECTION_LEFT);


        swipeMenuListView.setOnSwipeListener(new SwipeMenuListView.OnSwipeListener() {

            @Override
            public void onSwipeStart(int position) {
                // swipe start
                System.out.println("setOnSwipeListener onSwipeStart");

            }

            @Override
            public void onSwipeEnd(int position) {
                // swipe end
                System.out.println("setOnSwipeListener onSwipeEnd");

            }
        });

        ArrayList arrayList = new ArrayList<>();
        arrayList.addAll(Arrays.asList(arrData));
        CustomAdapter customAdapter=new CustomAdapter(arrayList);
        swipeMenuListView.setAdapter(customAdapter);
    }

    /**
     * Custom Adapter for listview.
     */
    class CustomAdapter extends BaseAdapter {
        private ArrayList<String> mData = new ArrayList<String>();
        private LayoutInflater mInflater;

        public CustomAdapter(ArrayList arrayList) {
            mInflater = (LayoutInflater) getSystemService(Context.LAYOUT_INFLATER_SERVICE);
            mData=arrayList;
        }


        @Override
        public int getCount() {
            return mData.size();
        }

        @Override
        public String getItem(int position) {
            return mData.get(position);
        }

        @Override
        public long getItemId(int position) {
            return position;
        }

        @Override
        public View getView(int position, View convertView, ViewGroup parent) {
            ViewHolder holder = null;
            int type = getItemViewType(position);
            if (convertView == null) {
                holder = new ViewHolder();
                convertView = mInflater.inflate(R.layout.row_item, null);
                holder.textView = (TextView) convertView.findViewById(R.id.textView);
                convertView.setTag(holder);
            } else {
                holder = (ViewHolder) convertView.getTag();
            }
            holder.textView.setText(mData.get(position));
            return convertView;
        }
    }

    public class ViewHolder {
        public TextView textView;
    }
}

activity_main.xml
 1
 2
 3
 4
 5
 6
 7
 8
 9
10
<RelativeLayout xmlns:android="http://schemas.android.com/apk/res/android"
    xmlns:tools="http://schemas.android.com/tools" android:layout_width="match_parent"
    android:layout_height="match_parent">

    <swipemenulistview.SwipeMenuListView
        android:id="@+id/listView"
        android:layout_width="match_parent"
        android:layout_height="match_parent" />

</RelativeLayout>

Refer below link for more information and to find original project on github.
https://github.com/baoyongzhang/SwipeMenuListView

Tuesday 11 August 2015

HB Blog 89: UI/UX Images With Appropriate Sizes And Resolutuons In Android And iOS.

Mobile technology is growing at a very pace, and mobile technology and applications attract user with its UI/UX. The user interface(UI) is one of the most important parts of any program because it determines how easily you can make the program do what you want. A powerful program with a poorly designed user interface has little value. User experience design (UXD or UED) is the process of enhancing user satisfaction by improving the usability, accessibility, and pleasure provided in the interaction between the user and the product. User experience design encompasses traditional human–computer interaction (HCI) design, and extends it by addressing all aspects of a product or service as perceived by users. UI and UX in mobile applications are depended on images that the application is developed with. It includes appropriate sizes, colors, resolutions, density, etc.
There is a standard used for specific images for place where image is to be used with appropriate sizes and resolutions. In Android, below table explains the sizes and resolutions for the different types of icons used by applications.


MDPI (Baseline) HDPI XHDPI XXHDPI XXXHDPI
Scale 1 x 1.5 x 2 x 3 x 4 x
DPI ~ 160 dpi ~ 240 dpi ~ 320 dpi ~ 480 dpi ~ 640 dpi
App Launcher Icons 48 px 72 px 96 px 144 px 192 px
Action bar Icons 32 px (24px inset) 48 px 64 px 96 px 128 px
Small / Contextual Icons 16 px (12px inset) 24 px 32 px 48 px 64 px
Notification Icons 24 px (22px inset) 36 px 48 px 72 px 96 px

In iOS, below table explains the sizes and resolutions for the different types of icons used by applications.


Asset
iPhone 6 Plus (@3x)
iPhone 6 and iPhone 5 (@2x)
iPhone 4s (@2x)
iPad and iPad mini (@2x)
iPad 2 and iPad mini (@1x)
App icon (required for all apps)
180 x 180
120 x 120
120 x 120
152 x 152
76 x 76
App icon for the App Store (required for all apps)
1024 x 1024
1024 x 1024
1024 x 1024
1024 x 1024
1024 x 1024
Launch file or image (required for all apps)
Use a launch file (see Launch Images)
For iPhone 6, use a launch file (see Launch Images)
For iPhone 5, 640 x 1136
640 x 960
1536 x 2048 (portrait)
2048 x 1536 (landscape)
768 x 1024 (portrait)
1024 x 768 (landscape)
Spotlight search results icon (recommended)
120 x 120
80 x 80
80 x 80
80 x 80
40 x 40
Settings icon (recommended)
87 x 87
58 x 58
58 x 58
58 x 58
29 x 29
Toolbar and navigation bar icon (optional)
About 66 x 66
About 44 x 44
About 44 x 44
About 44 x 44
About 22 x 22
Tab bar icon (optional)
About 75 x 75 (maximum: 144 x 96)
About 50 x 50 (maximum: 96 x 64)
About 25 x 25 (maximum: 48 x 32)
Default Newsstand cover icon for the App Store (required for Newsstand apps)
At least 1024 pixels on the longest edge
At least 512 pixels on the longest edge
Web clip icon (recommended for web apps and websites)
180 x 180
120 x 120
120 x 120
152 x 152
76 x 76

Saturday 8 August 2015

HB Blog 88: Project Loon - Network Of Balloons.

Google is growing very fast and has many research and development work going on. It believes in changing future of people with all aspects and provide modernized and well developed standard for people living their day to day life. One of the similar example is Project loon developed by Google with the mission of providing Internet access to rural and remote areas.  
What is Project Loon?
Project Loon is a network of balloons traveling on the edge of space, designed to connect people in rural and remote areas, help fill coverage gaps, and bring people back online after disasters.
Project Loon balloons float in the stratosphere, twice as high as airplanes and the weather. In the stratosphere, there are many layers of wind, and each layer of wind varies in direction and speed. Loon balloons go where they’re needed by rising or descending into a layer of wind blowing in the desired direction of travel. By partnering with Telecommunications companies to share cellular spectrum we’ve enabled people to connect to the balloon network directly from their phones and other LTE-enabled devices. The signal is then passed across the balloon network and back down to the global Internet on Earth.

How does it work?
Project Loon balloons travel approximately 20 km above the Earth’s surface in the stratosphere. Winds in the stratosphere are stratified, and each layer of wind varies in speed and direction. Project Loon uses software algorithms to determine where its balloons need to go, then moves each one into a layer of wind blowing in the right direction. By moving with the wind, the balloons can be arranged to form one large communications network.
Situated on the edge of space, between 10 km and 60 km in altitude, the stratosphere presents unique engineering challenges: air pressure is 1% that at sea level, and this thin atmosphere offers less protection from UV radiation and dramatic temperature swings, which can reach as low as -80°C. By carefully designing the balloon envelope to withstand these conditions, Project Loon is able to take advantage of the stratosphere’s steady winds and remain well above weather events, wildlife and airplanes.
Each balloon can provide connectivity to a ground area about 40 km in diameter using a wireless communications technology called LTE. To use LTE, Project Loon partners with telecommunications companies to share cellular spectrum so that people will be able to access the Internet everywhere directly from their phones and other LTE-enabled devices. Balloons relay wireless traffic from cell phones and other devices back to the global Internet using high-speed links.

How it is designed?
It is made up of Envelope, Solar panels, Electronics, etc.
Envelope:- The inflatable part of the balloon is called a balloon envelope. A well-made balloon envelope is critical for allowing a balloon to last around 100 days in the stratosphere. Loon’s balloon envelopes are made from sheets of polyethylene plastic, and they measure fifteen meters wide by twelve meters tall when fully inflated. When a balloon is ready to be taken out of service, gas is released from the envelope to bring the balloon down to Earth in a controlled descent. In the unlikely event that a balloon drops too quickly, a parachute attached to the top of the envelope is deployed.
Solar panels:- Each balloon’s electronics are powered by an array of solar panels. The solar array is a flexible plastic laminate supported by a light-weight aluminum frame. It uses high efficiency monocrystalline solar cells. The solar array is mounted at a steep angle to effectively capture sunlight on short winter days at higher latitudes. The array is divided into two sections facing in opposite directions, allowing us to capture energy in any orientation as the balloons spin slowly in the wind. The panels produce approximately 100 Watts of power in full sun, which is enough to keep Loon’s electronics running while also charging a battery for use at night. By moving with the wind and charging in the sun, Project Loon is able to power itself using entirely renewable energy sources.
Electronics:- A small box containing the balloon’s electronics hangs underneath the inflated envelope, like the basket carried by a hot air balloon. This box contains circuit boards that control the system, radio antennas to communicate with other balloons and with Internet antennas on the ground, and lithium ion batteries to store solar power so the balloons can operate throughout the night.

Wednesday 5 August 2015

HB Blog 87: Android Root Equivalent Vulnerabilities Detected And Fixed.

In computer security, a vulnerability is a weakness which allows an attacker to reduce a system's information assurance. Vulnerability is the intersection of three elements: a system susceptibility or flaw, attacker access to the flaw, and attacker capability to exploit the flaw. To exploit a vulnerability, an attacker must have at least one applicable tool or technique that can connect to a system weakness. In this frame, vulnerability is also known as the attack surface.
Many root equivalent vulnerabilities are found in Android which could exploit an application. This means vulnerabilities which allow an application (malicious or compromised) to either directly gain root or gain privileges which can then be used to obtain root. Below, I have listed few android vulnerabilities that are detected and fixed with there basic descriptions,

Name:- dhcpd buffer overrun.
Root Category:- Network.
Description:- The specific flaw exists within the parsing of the DHCP options in a DHCP ACK packet. The vulnerability is triggered when the LENGTH of an option, when added to the current read position, exceeds the actual length of the DHCP options buffer. An attacker can leverage this vulnerability to execute code on the device. This remote code execution vulnerability executes code as the dhcp user which limit's its severity.

Name:- TowelRoot.
Root Category:- Network.
Description:- The futex_requeue function in kernel/futex.c in the Linux kernel through 3.14.5 does not ensure that calls have two different futex addresses, which allows local users to gain privileges via a crafted FUTEX_REQUEUE command that facilitates unsafe waiter modification.

Name:- Defy republic init_runit.
Root Category:- Permissions.
Description:- A certain configuration of Android 2.3.7 on the Motorola Defy XT phone for Republic Wireless uses init to create a /dev/socket/init_runit socket that listens for shell commands, which allows local users to gain privileges by interacting with a LocalSocket object. Stack-based buffer overflow in the sub_E110 function in init in a certain configuration of Android 2.3.7 on the Motorola Defy XT phone for Republic Wireless allows local users to gain privileges or cause a denial of service (memory corruption) by writing a long string to the /dev/socket/init_runit socket that is inconsistent with a certain length value that was previously written to this socket.

Name:- Qualcomm chown init scripts.
Root Category:- Permissions.
Description:- Insecure owner/permission changes in init shell scripts: During the device start-up phase, several init shell scripts are executed with root privileges to configure various aspects of the system. During this process, standard toolchain commands such as chown or chmod are used to, e.g., change the owner of the sensor settings file to the system user. As these commands follow symbolic links (symlinks), an attacker with write access to these resources is able to conduct symlink attacks and thus change for example the owner of an arbitrary file to system. This flaw can be used to, e.g., elevate privileges.

Name:- APK duplicate file.
Root Category:- Signature.
Description:- Android does not properly check cryptographic signatures for applications, which allows attackers to execute arbitrary code via an application package file (APK) that is modified in a way that does not violate the cryptographic signature.

Name:- Fake ID.
Root Category:- Signature.
Description:- The software does not properly validate an application's certificate chain. An application can supply a specially crafted application identity certificate to impersonate a privileged application and gain access to vendor-specific device administration extensions. The vulnerability resides in the createChain() and findCert() functions of the Android JarUtils class.
Name:- RageAgainstTheCage adb.
Root Category:- System.
Description:- adb fails to check setuid return code and this can be caused to fail by the shell user already having RLIMIT_NPROC processes.

Name:- keystore buffer.
Root Category:- System.
Description:- Stack-based buffer overflow in the encode_key function in /system/bin/keystore in the KeyStore service in Android 4.3 allows attackers to execute arbitrary code, and consequently obtain sensitive key information or bypass intended restrictions on cryptographic operations, via a long key name.

Name:- Qualcomm Gandalf camera driver..
Root Category:- Kernel.
Description:- The camera driver provides several interfaces to user space clients. The user space clients communicate to the kernel via syscalls such as ioctl or mmap. The camera driver provides an uncontrolled mmap interface that allows an application with access to the device file to map physical memory exceeding the camera driver's memory into user space. A locally installed, unprivileged application can use this flaw to escalate privileges.

Name:- Qualcomm out of bounds camera.
Root Category:- Kernel.
Description:- The camera driver provides an ioctl system call interface to user space clients for communication. When processing this communication, the msm_ioctl_server, msm_server_send_ctrl, and msm_ctrl_cmd_done functions use a user-supplied value as an index to the server_queue array for read and write operations without any boundary checks. A local application with access to the camera device nodes can use this flaw to, e.g., elevate privileges.

Saturday 1 August 2015

HB Blog 86: Android Device Monitor Tools.

The Android SDK includes a variety of tools that help you develop mobile applications for the Android platform. Android Device Monitor is a stand-alone tool that provides a graphical user interface for several Android application debugging and analysis tools. The Monitor tool does not require installation of an integrated development environment, such as Android Studio, and encapsulates the following tools:
DDMS :-
Android Studio includes a debugging tool called the Dalvik Debug Monitor Server (DDMS), which provides port-forwarding services, screen capture on the device, thread and heap information on the device, logcat, process, and radio state information, incoming call and SMS spoofing, location data spoofing, and more. On Android, every application runs in its own process, each of which runs in its own virtual machine (VM). Each VM exposes a unique port that a debugger can attach to.
When DDMS starts, it connects to adb. When a device is connected, a VM monitoring service is created between adb and DDMS, which notifies DDMS when a VM on the device is started or terminated. Once a VM is running, DDMS retrieves the VM's process ID (pid), via adb, and opens a connection to the VM's debugger, through the adb daemon (adbd) on the device. DDMS can now talk to the VM using a custom wire protocol.
Start DDMS :-
To use it, launch the Android Device Monitor, and click the DDMS menu button. DDMS works with both the emulator and a connected device. If both are connected and running simultaneously, DDMS defaults to the emulator.

Hierarchy Viewer :-
The Hierarchy Viewer allows you to debug and optimize your user interface. It provides a visual representation of the layout's View hierarchy (the Layout View) and a magnified inspector of the display (the Pixel Perfect View).
Start Hierarchy Viewer :-
From Android Studio, choose Tools > Android Device Monitor or click the Android Device Monitor icon. Click the Open Perspectives icon and select Hierarchy View.

Systrace :-
The Systrace tool helps analyze the performance of your application by capturing and displaying execution times of your applications processes and other Android system processes. The tool combines data from the Android kernel such as the CPU scheduler, disk activity, and application threads to generate an HTML report that shows an overall picture of an Android device’s system processes for a given period of time.
The Systrace tool is particularly useful in diagnosing display problems where an application is slow to draw or stutters while displaying motion or animation. 
Start Systrace :-
The Systrace tool has different command line options for devices running Android 4.3 (API level 18) and higher versus devices running Android 4.2 (API level 17) and lower.
The general syntax for running Systrace from the command line is as follows.
$ cd android-sdk/platform-tools/systrace
$ python systrace.py [options] [category1] [category2] ... [categoryN]
Traceview :-
Traceview is a graphical viewer for execution logs that you create by using the Debug class to log tracing information in your code. Traceview can help you debug your application and profile its performance. When you have a trace log file (generated by adding tracing code to your application or by DDMS), you can load the log files in Traceview, which displays the log data in two panels:
    A timeline panel -- describes when each thread and method started and stopped
    A profile panel -- provides a summary of what happened inside a method

Start Traceview :-
In the Android Device Monitor tool bar, click DDMS and select a process.
Click the Start Method Profiling icon to start method profiling.
After the profiling is complete, click the Stop Method Profiling icon to display the traceview.