Saturday 27 December 2014

HB Blog 50: Android Use Outside Of Smartphones And Tablets.

Android operating system is growning in a great pace.Along with smartphones and tablets there are number of devices that are coming in market which have enchanced user experience and way of comfort with the great innovative technologies and developments.
The open and customizable nature of Android allows it to be used on other electronics aside from smartphones and tablets.

In this post, I will like to mention few of them,
Smart TVs
A smart TV device is either a television set with integrated Internet capabilities or a set-top box for television that offers more advanced computing ability and connectivity than a contemporary basic television set.
Google TV & Android TV are the smart TV platform developed by Google.
Android TV can be built into both TVs and standalone set-top boxes. Users will have access to the Google Play Store to download Android apps, including media streaming services Netflix and Hulu, as well as games.

Smart Glasses
Google Glass is a type of wearable technology with an optical head-mounted display (OHMD). It was developed by Google with the mission of producing a mass-market ubiquitous computer.

Smart Watch
A smartwatch is a computerized wristwatch with functionality that is enhanced beyond timekeeping. They can perform basic tasks, such as calculations, translations, and game-playing, modern smartwatches are effectively wearable computers.
Android Wear is a version of Google's Android operating system designed for smartwatches and other wearables.

Android Auto
Android Auto is a telematics standard developed by Google to allow mobile devices running the Android operating system to be operated in automobiles through the dashboard's head unit.

There are many more android devices such as laptops,cameras,headphones,car CD and DVD players,portable media players,landline,Voice over IP phones,video game console,etc.
In coming future, we will be surrounded by number of more such technology where android will be playing great part and have great importance.

Friday 26 December 2014

HB Blog 49: Android - AsyncTask VS Handlers VS Threads.


Threads:
A Thread is a concurrent unit of execution. It has its own call stack for methods being invoked, their arguments and local variables. Each application has at least one thread running when it is started, the main thread, in the main ThreadGroup. The runtime keeps its own threads in the system thread group.
There are two ways to execute code in a new thread. You can either subclass Thread and overriding its run() method, or construct a new Thread and pass a Runnable to the constructor. In either case, the start() method must be called to actually execute the new Thread.
Each Thread has an integer priority that affect how the thread is scheduled by the OS. A new thread inherits the priority of its parent. A thread's priority can be set using the setPriority(int) method.

Handlers:
A Handler allows you to send and process Message and Runnable objects associated with a thread's MessageQueue. Each Handler instance is associated with a single thread and that thread's message queue. When you create a new Handler, it is bound to the thread / message queue of the thread that is creating it -- from that point on, it will deliver messages and runnables to that message queue and execute them as they come out of the message queue.
There are two main uses for a Handler: (1) to schedule messages and runnables to be executed as some point in the future; and (2) to enqueue an action to be performed on a different thread than your own.
Scheduling messages is accomplished with the post(Runnable), postAtTime(Runnable, long), postDelayed(Runnable, long), sendEmptyMessage(int), sendMessage(Message), sendMessageAtTime(Message, long), and sendMessageDelayed(Message, long) methods. The post versions allow you to enqueue Runnable objects to be called by the message queue when they are received; the sendMessage versions allow you to enqueue a Message object containing a bundle of data that will be processed by the Handler's handleMessage(Message) method (requiring that you implement a subclass of Handler).
When posting or sending to a Handler, you can either allow the item to be processed as soon as the message queue is ready to do so, or specify a delay before it gets processed or absolute time for it to be processed. The latter two allow you to implement timeouts, ticks, and other timing-based behavior.
When a process is created for your application, its main thread is dedicated to running a message queue that takes care of managing the top-level application objects (activities, broadcast receivers, etc) and any windows they create. You can create your own threads, and communicate back with the main application thread through a Handler. This is done by calling the same post or sendMessage methods as before, but from your new thread. The given Runnable or Message will then be scheduled in the Handler's message queue and processed when appropriate.

AsyncTask:
AsyncTask enables proper and easy use of the UI thread. This class allows to perform background operations and publish results on the UI thread without having to manipulate threads and/or handlers.
AsyncTask is designed to be a helper class around Thread and Handler and does not constitute a generic threading framework. AsyncTasks should ideally be used for short operations (a few seconds at the most.) If you need to keep threads running for long periods of time, it is highly recommended you use the various APIs provided by the java.util.concurrent package such as Executor, ThreadPoolExecutor and FutureTask.
An asynchronous task is defined by a computation that runs on a background thread and whose result is published on the UI thread. An asynchronous task is defined by 3 generic types, called Params, Progress and Result, and 4 steps, called onPreExecute, doInBackground, onProgressUpdate and onPostExecute.

HB Blog 48: Few Android Applications For Programmers.

The applications that programmers can find handy in their day to day life. It makes developers life preety simple as well as more professional.

1)Google Analytics
Click here to download : Google Play Store
Access all of your Google Analytics web and app reporting profiles from your mobile device. The app has an all-new look and feel that’s optimized for phones and tablets, so you can easily get your Analytics data anytime, anywhere.
2)Stack Exchange
Click here to download : Google Play Store 
Stack Exchange is a network of 100+ question and answer communities on everything from software programming to cooking, photography, and gaming. With this app you can:
• Track all your interests in one place with the new combined feed view
• Get instant notifications when you receive an answer or comment
• Search for questions, or browse by tag
• Ask, answer, comment and vote on questions
This is the official app for all Stack Exchange sites, including Stack Overflow, Super User, Server Fault, Ask Ubuntu and Arqade.
New to Stack Exchange? Here’s how it works:
• Anybody can ask or answer a question
• The best answers are voted to the top
• You earn reputation points for every vote you receive
• Unlock privileges as you earn reputation, like the ability to comment or vote
• The community is run by you: moderators are elected, and top users have access to special tools to help moderate
3)AIDE - Android IDE - Java, C++
Click here to download : Google Play Store 
AIDE is an integrated development environment (IDE) for developing real Android apps directly on your Android device. Follow interactive coding lessons and step-by-step become an expert app developer. Visually design apps, write code with the feature rich editor with code completion, real-time error checking, refactoring and smart code navigation, and run your app with a single click.
AIDE features interactive lessons with step-by-step instructions to learn Android app development and Java programming skills. Follow the lessons, become an expert and apply what you've learned in your own app projects.
AIDE will turn your Android tablet with keyboard into a real development box. We use the Transformer Prime to code with AIDE. AIDE will turn your Android Phone into a small development computer to browse and touch your code on the go.
AIDE supports building apps with Java/Xml and the Android SDK, apps with C/C++ and the Android NDK as well as pure Java console applications. AIDE is fully compatible with Eclipse projects. You can just copy the sourcecode to your device and open the Eclipse project in AIDE to start coding. Alternatively you can keep your sourcecode on your Dropbox - AIDE integrates with Dropbox and allows to easily download from your Dropbox and sync back your changes. AIDE can also open Android Studio projects, which follow the default folder structure. AIDE also supports Git for professional development
4)AWD - PHP/HTML/CSS/JS IDE
Click here to download : Google Play Store 
Android Web Developer (AWD) is a IDE (Integrated development environment) for web developers. Supports next language and formats: PHP, CSS, JS, HTML, JSON.
Android Web Developer will turn your Android tablet with keyboard into a real development box. Android Web Developer will turn your Android Phone into a small development computer to browse and touch your code on the go.
It a unique mobile software for web developers. It allows you to create your own html, php, javascript, css and other pages or edit already existing. Also you can manage work with remote projects through FTP, FTPS, SFTP WebDAV as well as managing your local files and folders.
5)The File Converter
Click here to download : Google Play Store 
Convert Video, Audio, Images, Documents, E-books and archives between nearly any file formats! The most complete and full-featured file converter on the market!
Files are converted in the cloud so your battery is not wasted and conversion speeds are much faster!

HB Blog 47: Few Helpful Websites For Programmers.

1) Code Beautify
Click here : http://codebeautify.org/
Description : CodeBeautify is an online code beautifier which allows you to beautify your source code.

2) Stackoverflow
Click here : http://stackoverflow.com/
Description : A language-independent collaboratively edited question and answer site for programmers.

3) Tutorialspoint
Click here : http://www.tutorialspoint.com/
Description : Free tutorials and reference manuals online site with thousands of working examples, which you can use in your day to day software development.
4)India Bix
Click here :  http://www.indiabix.com/
Description :IndiaBIX provides you lots of fully solved Aptitude questions and answers with explanation. 
5) It Ebooks
Click here : http://it-ebooks.info/
Description :This site helps to download IT ebooks for free, related to various programming languages and more.

Wednesday 24 December 2014

HB Blog 46: Android Daydream Interactive Screensaver Mode For Android Devices.

Daydream is a new interactive screensaver mode for Android devices. It activates automatically when the device is inserted into a dock or when the device is left idle while plugged in to a charger (instead of turning the screen off). Daydream displays one dream at a time, which may be a purely visual, passive display that dismisses upon touch, or may be interactive and responsive to the full suite of input events. Your dreams run in your app’s process and have full access to the Android UI toolkit, including views, layouts, and animations, so they are more flexible and powerful than either live wallpapers or app widgets.

The DreamService lifecycle is as follows:
    onAttachedToWindow()
    Use this for initial setup, such as calling setContentView().
    onDreamingStarted()
    Your dream has started, so you should begin animations or other behaviors here.
    onDreamingStopped()
    Use this to stop the things you started in onDreamingStarted().
    onDetachedFromWindow()
    Use this to dismantle resources (for example, detach from handlers and listeners).

Refer the below link for complete sample code:-
Download Sample Code
Download Apk File
Have a look on few code snippets,

MyDayDreamService.java
 1
 2
 3
 4
 5
 6
 7
 8
 9
10
11
12
13
14
15
16
17
18
19
20
21
22
23
24
25
26
27
28
29
30
31
32
33
34
35
36
37
38
39
public class MyDayDreamService extends DreamService {
    @Override
   public void onAttachedToWindow() {
       super.onAttachedToWindow();

       //allow user touch
       setInteractive(true);
 
       // Allow full screen
       setFullscreen(true);
 
       //Add text and image to dream layout
       RelativeLayout r1 = new RelativeLayout(this);
      
       RelativeLayout.LayoutParams params = new RelativeLayout.LayoutParams(LayoutParams.WRAP_CONTENT, LayoutParams.WRAP_CONTENT);
       params.addRule(RelativeLayout.CENTER_HORIZONTAL);
      
       TextView textView = new TextView(this);
       textView.setId(1);
       textView.setText("This is a HB demo of the DayDream.");
       textView.setTextSize(35);
       textView.setLayoutParams(params);
       
       r1.addView(textView,params);

       RelativeLayout.LayoutParams params2 = new RelativeLayout.LayoutParams(300, 250);
       params2.addRule(RelativeLayout.BELOW,1); 
       params2.addRule(RelativeLayout.CENTER_HORIZONTAL);
       ImageView iv = new ImageView(this);
       iv.setImageResource(R.drawable.android);
       iv.setLayoutParams(params2);
       
       
       r1.addView(iv,params2);
      
       setContentView(r1);
          
   }
}

 AndroidManifest.xml
 1
 2
 3
 4
 5
 6
 7
 8
 9
10
11
12
13
14
15
16
17
18
19
20
21
22
23
24
25
26
27
28
29
30
31
32
33
34
35
36
37
38
<?xml version="1.0" encoding="utf-8"?>
<manifest xmlns:android="http://schemas.android.com/apk/res/android"
    package="com.example"
    android:versionCode="1"
    android:versionName="1.0" >

    <uses-sdk
        android:minSdkVersion="17"
        android:targetSdkVersion="17" />

    <application
        android:allowBackup="true"
        android:icon="@drawable/ic_launcher"
        android:label="@string/app_name"
        android:theme="@style/AppTheme" >
        <activity
            android:name="com.example.MainActivity"
            android:label="@string/app_name" >
            <intent-filter>
                <action android:name="android.intent.action.MAIN" />

                <category android:name="android.intent.category.LAUNCHER" />
            </intent-filter>
        </activity>
        
        <service
        android:name=".MyDayDreamService"
         android:exported="true"
          android:label="AndroidDayDreamDemo" >
        <intent-filter>
          <action android:name="android.service.dreams.DreamService" />
           <category android:name="android.intent.category.DEFAULT" />
          </intent-filter>
   </service>
        
    </application>

</manifest>

Tuesday 23 December 2014

HB Blog 45: How To Download And Unzip File From Server In Android???

In this post, I will show how to download zip file from server into android device and then extract files from the downloaded zip file.

Android class "java.net.URLConnection" is used for downloading purpose and "java.util.zip" package is used for unzipping purpose.


I have added two separate buttons for two asynctasks for downloading and unzipping purpose separately. I first used URLConnection class to download zip file from url and used InputStream to write file into sdcard. Then, used ZipInputStream class for unzipping the same file from sdcard.

Refer the below link for complete sample code:-
Download Sample Code
Download Apk File
Have a look on few code snippets,

Async_download.java
 1
 2
 3
 4
 5
 6
 7
 8
 9
10
11
12
13
14
15
16
17
18
19
20
21
22
23
24
25
26
27
28
29
30
31
32
33
34
35
36
37
38
39
40
41
42
43
44
45
46
47
48
49
50
51
52
53
54
55
56
57
58
/**
  * This class is used to download zip file.
  * @author <b>Harshal Benake</b>
  *
  */
 public class Async_download extends AsyncTask<String, String, String> {
  Activity mActivity;
  private ProgressDialog mProgressDialog;
  public Async_download(Activity activity) {
   this.mActivity=activity;
  }
  @Override
  protected void onPreExecute() {
   super.onPreExecute();
   mProgressDialog = new ProgressDialog(mActivity);
   mProgressDialog.setMessage("Downloading file..");
   mProgressDialog.setProgressStyle(ProgressDialog.STYLE_HORIZONTAL);
   mProgressDialog.setCancelable(false);
   mProgressDialog.show();
  }

  @Override
  protected String doInBackground(String... aurl) {
   int count;
  try {
  URL url = new URL(aurl[0]);
  URLConnection connection = url.openConnection();
  connection.connect();

  int lenghtOfFile = connection.getContentLength();
  
  InputStream input = new BufferedInputStream(url.openStream());
  OutputStream output = new FileOutputStream(Constant.SDCARD+Constant.FILENAME);

  byte data[] = new byte[1024];
  long total = 0;
  
   while ((count = input.read(data)) != -1) {
    total += count;
    publishProgress(""+(int)((total*100)/lenghtOfFile));
    output.write(data, 0, count);
   }

   output.flush();
   output.close();
   input.close();
  } catch (Exception e) {}
  return null;

  }
  protected void onProgressUpdate(String... progress) {
    mProgressDialog.setProgress(Integer.parseInt(progress[0]));
  }

  @Override
  protected void onPostExecute(String unused) {
   mProgressDialog.dismiss();
  }

Async_unzipping.java
 1
 2
 3
 4
 5
 6
 7
 8
 9
10
11
12
13
14
15
16
17
18
19
20
21
22
23
24
25
26
27
28
29
30
31
32
33
34
35
36
37
38
39
40
41
42
43
44
45
46
47
48
49
50
51
52
/**
 * This class is used to unzip zip file from sdcard.
 * @author <b>Harshal Benake</b>
 *
 */
public class Async_unzipping extends AsyncTask<String, String, String> {
 Activity mActivity;
 private ProgressDialog mProgressDialog;

 public Async_unzipping(Activity activity) {
  this.mActivity=activity;
 }
 
 @Override
 protected void onPreExecute() {
  super.onPreExecute();
  mProgressDialog = new ProgressDialog(mActivity);
  mProgressDialog.setMessage("Extracting file..");
  mProgressDialog.setCancelable(false);
  mProgressDialog.show();
 }
   
 @Override
 protected String doInBackground(String... params) {
   
     try  { 
       FileInputStream fin = new FileInputStream(Constant.SDCARD+Constant.FILENAME); 
       ZipInputStream zin = new ZipInputStream(fin); 
       ZipEntry ze = null; 
       while ((ze = zin.getNextEntry()) != null) {    
        
           FileOutputStream fout = new FileOutputStream(Constant.SDCARD + ze.getName()); 
           for (int c = zin.read(); c != -1; c = zin.read()) { 
             fout.write(c); 
           } 
  
           zin.closeEntry(); 
           fout.close(); 
         } 
          
       zin.close(); 
     } catch(Exception e) { 
     } 
  
   
  return null;
 } 
 
 @Override
 protected void onPostExecute(String unused) {
  mProgressDialog.dismiss();
 }

Thursday 18 December 2014

HB Blog 44: How To Boot Windows OS 7/8 Using Bootable Pendrive???

In this post, I will show how to create bootable pendrive. We usually boot pc OS via CD,Hardisk,etc.
The main advantage of bootable pendrive is that it gives you mobility.
There are various methods and softwares that can be use to create bootable pendrives.
I prefer CMD commands for creating bootable pendrive for booting OS especially for windows 7/8.
Following are the steps for creating bootable pendrive:
1. Run command promt as Administrator.(Right click on cmd click on 'Run as Administrator').

2. Type 'DISKPART' in command prompt. Now type “list disk” to see all of your connected disk
drives.

3. Type this following command one by one.(Here Disk 1 is the disk number of my flash drive. So make sure Disk 1 is your flash drive disk number. If not then replace ''Disk 1" with proper disk number)
1. 'select disk 1'
2. 'clean'
3. 'create partition primary'
4. 'select partition 1'
5. 'active'
6. 'format fs=NTFS QUICK'
7. 'assign'
8. 'exit'

4. You'll be exited from DISKPART utility. Now use bootsect utility to make your flash drive bootable. To do so, insert the Windows 7/8 DVD in DVD drive. Here, the DVD drive is J: and the USB drive is I: (Replace this drive letter with proper drive letter of your PC)
Now type the following command in command promt one by one.
1. J:
2. cd J:\boot
3. BOOTSECT.EXE/NT60 I:
Your USB drive now has been update with BOOTMGR compatible code. Now close the Command Prompt windows.

5. Now open your Windows 7/8 DVD drive and copy all files in your Flash Drive.

6. Everything is done. Now boot from your pen drive and continue Windows installation.

Tuesday 16 December 2014

HB Blog 43: Google Cloud Messaging (GCM) Client Integration For Android Devices.

Google Cloud Messaging (GCM) for Android is a service that allows you to send data from your server to your users' Android-powered device, and also to receive messages from devices on the same connection.A Google Cloud Messaging (GCM) client is a GCM-enabled app that runs on an Android device. A full GCM implementation requires both a client implementation and a server implementation.

In this blog post, I would talk about a Google Cloud Messaging (GCM) client implementation specifically.

A GCM implementation includes a Google-provided connection server, a 3rd-party app server that interacts with the connection server, and a GCM-enabled client app running on an Android device.

The steps involved in writing a GCM client-side application are as follows:
1)Set up Google Play Services using its SDK.
2)Add the following to your application's manifest:
   a)Android permissions related to Internet, register and receive messages, Google account, wake lock, GCM Framework, etc. 
   b)A receiver for com.google.android.c2dm.intent.RECEIVE.
   c)A Service (typically an IntentService) to which the WakefulBroadcastReceiver passes off the work of handling the GCM message.
3)Finally, write your application code for checking Google Play Services APK, register for GCM, send a message, receive a message, etc.

I have added a sample example in this post that implements GCM client services by sending device information as well as gcm notification id to the server and in return server will send message which will be displayed in form of notification on client device.

Have a look on few code snippets,
GCMIntentService.java
 1
 2
 3
 4
 5
 6
 7
 8
 9
10
11
12
13
14
15
16
17
18
19
20
21
22
23
24
25
26
27
28
29
30
31
32
33
34
35
36
37
38
39
40
41
42
43
44
45
46
47
48
49
50
51
52
53
54
55
56
57
58
59
60
61
62
63
64
65
66
67
68
public class GCMIntentService extends GCMBaseIntentService {
    String TAG="GCM";
    @Override
    protected void onError(Context arg0, String arg1) {
 try {
     Log.v(TAG, "onError() "+arg1);
 } catch (Exception e) {
     e.printStackTrace();
 }
    }

    @Override
    protected void onMessage(Context context, Intent intent) {
 try {
     String action = intent.getAction();
     Log.v(TAG, "onMessage() "+action);
     if (action.equals("com.google.android.c2dm.intent.REGISTRATION")) {
  Log.v(TAG,"Handle Registration");
     } else if (action.equals("com.google.android.c2dm.intent.RECEIVE")) {
  Log.v(TAG,"intent.getExtras() "+intent.getExtras());

  /**Show notification.*/
  String messageText= intent.getStringExtra("message")+"";
  NotificationManagerGCM notificationManagerGCM=new NotificationManagerGCM();
  if(messageText!=null && !messageText.equalsIgnoreCase("") && !messageText.equalsIgnoreCase("null"))
  {
      notificationManagerGCM.showNotificationRemoveableGCM(context,messageText);
  }
  else
  {
      notificationManagerGCM.showNotificationRemoveableGCM(context,"Notification Message GCM Demo");
  }
     }
 } 
 catch (Exception e) {
     e.printStackTrace();
 }
    }

    @Override
    protected void onRegistered(Context arg0, String arg1) {
 try {
     Log.v(TAG, "onRegistered() "+arg1);
 } catch (Exception e) {
     e.printStackTrace();
 }

    }

    @Override
    protected void onUnregistered(Context arg0, String arg1) {
 try {
     Log.v(TAG, "onUnregistered() "+arg1);
 } catch (Exception e) {
     e.printStackTrace();
 }

    }

    @Override
    protected String[] getSenderIds(Context context) {
 String[] ids = new String[1];
 NotificationManagerGCM managerTXTShield=new NotificationManagerGCM();
 ids[0] = managerTXTShield.getGCMSenderID(context);
 return ids;
    }

}

AccountManager.java
 1
 2
 3
 4
 5
 6
 7
 8
 9
10
11
12
13
14
15
16
17
18
19
20
21
22
23
24
25
26
27
28
29
30
31
32
33
34
35
36
37
38
39
40
41
42
43
44
45
46
47
48
49
50
51
52
53
54
55
56
57
58
59
60
61
62
63
64
65
66
67
68
69
70
71
72
73
74
75
76
77
78
79
public class AccountManager
{
    Context mContext;
    Resources mResources;
    String url,apiKey;

    public AccountManager(Context mContext){
 this.mContext = mContext;
 mResources = mContext.getResources();
 url = mContext.getResources().getString(R.string.url);
 apiKey = mContext.getResources().getString(R.string.api_key);

    }

    /**
     * This method is used to send device information for gcm notification.
     * 
     * @param context
     * @param user_id
     * @return
     */
    public String requestDeviceRegistration(Context context)
    {
 String responseStr = "";
 try{
     // Create a new HttpClient and Post Header
     HttpClient httpclient = new DefaultHttpClient();
     HttpPost httppost = new HttpPost(url);
     try{
  Utility utility = new Utility();
  String unique_device_id = Secure.getString(context.getContentResolver(), Secure.ANDROID_ID);
  if(unique_device_id == null || unique_device_id.equalsIgnoreCase("null") || unique_device_id.equalsIgnoreCase("")){
      unique_device_id = utility.getDeviceSerialNumber();
  }
  String device_name = utility.getDeviceName();
  String model_no = utility.getDeviceModelName();
  String device_os_version = utility.getDeviceSDKVersion();
  String notification_id = utility.getNotificationID(context);    
  PackageInfo pInfo = context.getPackageManager().getPackageInfo(context.getPackageName(), 0);
  String app_version = pInfo.versionName;

  System.out.println("apiKey: "+apiKey);
  System.out.println("unique_device_id: "+unique_device_id);
  System.out.println("notification_id: " + notification_id);
  System.out.println("device_name: "+device_name);
  System.out.println("model_no: "+model_no);
  System.out.println("device_os_version: "+device_os_version);
  System.out.println("app_version: "+app_version);


  // Add your data
  List<NameValuePair> nameValuePairs = new ArrayList<NameValuePair>(2);
  nameValuePairs.add(new BasicNameValuePair("unique_device_id", unique_device_id));
  nameValuePairs.add(new BasicNameValuePair("notification_id", notification_id));
  nameValuePairs.add(new BasicNameValuePair("device_name", device_name));
  nameValuePairs.add(new BasicNameValuePair("model_no", model_no));
  nameValuePairs.add(new BasicNameValuePair("device_os_version", device_os_version));
  nameValuePairs.add(new BasicNameValuePair("app_version", app_version));

  httppost.setEntity(new UrlEncodedFormEntity(nameValuePairs));

  // Execute HTTP Post Request
  HttpResponse httpResponse = httpclient.execute(httppost);

  HttpEntity responseEntity = httpResponse.getEntity();
  if(responseEntity != null){
      responseStr = EntityUtils.toString(responseEntity);
  }
     }
     catch(Exception e){
  e.printStackTrace();
     }
 }
 catch(Exception e){
     e.printStackTrace();
 }
 return responseStr;
    }
}

Refer the below link for complete sample code:-
Download Sample Code
Download Apk File

Monday 15 December 2014

HB Blog 42: What Is The Purpose Of R.java File In Android Application?

R.java is an auto generated file when you build an android application. It contains unique identifiers (normally 32bit numbers) for elements in each category (drawable, string, layout, color, etc.) of resources (elements under directory res) available in your android application.
The main purpose of R.java file is quick accessibility of resources in the project. If any resource has deleted or added to the project, R.java file will be updated automatically, this can be done by ADT plugin in Eclipse.
The ADT plugin in Eclipse will give you a warning if you try to modify this R.java file. Even if you modified this file, it may result into unknown output of your application. Below is the sample R.java file.

Once you provide a resource in your application, you can apply it by referencing its resource ID. All resource IDs are defined in your project's R class, which the aapt tool automatically generates.
When your application is compiled, aapt generates the R class, which contains resource IDs for all the resources in your res/ directory. For each type of resource, there is an R subclass (for example, R.drawable for all drawable resources), and for each resource of that type, there is a static integer (for example, R.drawable.icon). This integer is the resource ID that you can use to retrieve your resource.

Although the R class is where resource IDs are specified, you should never need to look there to discover a resource ID.
A resource ID is always composed of:
    The resource type: Each resource is grouped into a "type," such as string, drawable, and layout.
    The resource name, which is either: the filename, excluding the extension; or the value in the XML android:name attribute, if the resource is a simple value (such as a string).

There are two ways you can access a resource:

    In code: Using a static integer from a sub-class of your R class, such as:
    R.string.hello
    string is the resource type and hello is the resource name. There are many Android APIs that can access your resources when you provide a resource ID in this format. See Accessing Resources in Code.

    In XML: Using a special XML syntax that also corresponds to the resource ID defined in your R class, such as:
    @string/hello
    string is the resource type and hello is the resource name. You can use this syntax in an XML resource any place where a value is expected that you provide in a resource. See Accessing Resources from XML.

How R.java file will be created ?
In R.java file, each resource category will be created as one class. In each resource class all respective elements will be created as static members, means constants. So, we should not change these values. All these are final members also, so we must access them with their class names, like R.drawable.ic_launcher, R.layout.main, etc. See below pictures to know how classes will be created for each resource category.


The values directory under res directory is not a resource category. Some resource types such as strings, colors, styles, arrays, etc. are grouped and named as values. So that, no values class found in R.java file.


How many classes existed with name R in an android application ?
There are 2 classes available in each android application with name R.
1. First class is part of android core system or android SDK, which can be accessed as android.R We can see this class in R.class file which is available in android.jar file, which is automatically included in your project by ADT plugin.
2. Second class is part of our application, which can be accessed as yourpackagename.R (yourpackagename is like my.apps.dialer). We can see this class in R.java file which is available in directory gen. This R.java file is visible, only after successful build of your project.

Tuesday 2 December 2014

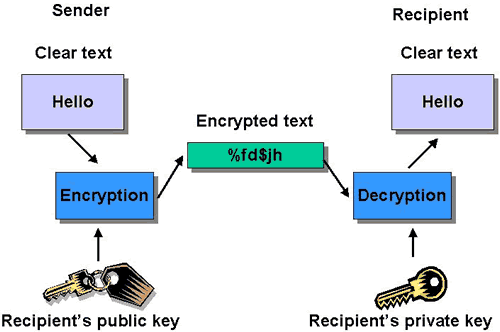
HB Blog 41: Encryption And Decryption Process Of String.

In cryptography, encryption is the process of encoding messages or information in such a way that only authorized parties can read it. Encryption does not of itself prevent interception, but denies the message content to the interceptor.
In cryptography, decryption is the process of decoding messages or information that has been encrypted.Decryption requires a secret key or password.

Have a look on few code snippets,

 1
 2
 3
 4
 5
 6
 7
 8
 9
10
11
12
13
14
15
16
17
18
19
20
21
22
23
24
25
26
27
28
29
30
31
32
33
34
// Original text
        String originalText = "This is my text - Harshal Benake";
        System.out.println("[ORIGINAL]:" + originalText);
        // Set up secret key spec for 128-bit AES encryption and decryption
        SecretKeySpec secretKeySpec = null;
        try {
            SecureRandom secureRandom = SecureRandom.getInstance("SHA1PRNG");
            secureRandom.setSeed("any data used as random seed".getBytes());
            KeyGenerator keyGenerator = KeyGenerator.getInstance("AES");
            keyGenerator.init(128, secureRandom);
            secretKeySpec = new SecretKeySpec((keyGenerator.generateKey()).getEncoded(), "AES");
        } catch (Exception e) {
            Log.e(TAG, "AES secret key spec error");
        }
        // Encode the original data with AES
        byte[] encodedBytes = null;
        try {
            Cipher cipher = Cipher.getInstance("AES");
            cipher.init(Cipher.ENCRYPT_MODE, secretKeySpec);
            encodedBytes = cipher.doFinal(originalText.getBytes());
        } catch (Exception e) {
            Log.e(TAG, "AES encryption error");
        }
        System.out.println("[ENCODED]:" + Base64.encodeToString(encodedBytes, Base64.DEFAULT));
        // Decode the encoded data with AES
        byte[] decodedBytes = null;
        try {
            Cipher cipher = Cipher.getInstance("AES");
            cipher.init(Cipher.DECRYPT_MODE, secretKeySpec);
            decodedBytes = cipher.doFinal(encodedBytes);
        } catch (Exception e) {
            Log.e(TAG, "AES decryption error");
        }
        System.out.println("[DECODED]:" + new String(decodedBytes));

Refer the below link for complete sample code:-
Download Sample Code
Download Apk File