Monday 27 July 2015

HB Blog 85: Creating Material Design Listing Using RecyclerView And CardView.

In this post, I will show how to use card view and recyclerview for listing data items. To create complex lists and cards with material design styles in your apps, you can use the RecyclerView and CardView widgets.

RecyclerView:- A flexible view for providing a limited window into a large data set. 
The RecyclerView widget is a more advanced and flexible version of ListView. This widget is a container for displaying large data sets that can be scrolled very efficiently by maintaining a limited number of views. To use the RecyclerView widget, you have to specify an adapter and a layout manager. To create an adapter, extend the RecyclerView.Adapter class. The details of the implementation depend on the specifics of your dataset and the type of views. A layout manager positions item views inside a RecyclerView and determines when to reuse item views that are no longer visible to the user. To reuse (or recycle) a view, a layout manager may ask the adapter to replace the contents of the view with a different element from the dataset.
CardView:- A FrameLayout with a rounded corner background and shadow. 
The CardView uses elevation property in lollipop version for shadows and falls back to a custom shadow implementation on older platforms. To create a card with a shadow, use the card_view:cardElevation attribute. CardView uses real elevation and dynamic shadows on Android 5.0 (API level 21) and above and falls back to a programmatic shadow implementation on earlier versions.

The RecyclerView and CardView widgets are part of the v7 Support Libraries. To use these widgets in your project, add these Gradle dependencies to your app's module:
dependencies {
    compile 'com.android.support:cardview-v7:21.0.+'
    compile 'com.android.support:recyclerview-v7:21.0.+'
}


Refer the below link for complete sample code:-
Download Sample Code
Download Apk File
Have a look on few code snippets,

RecycleViewActivity.java
 1
 2
 3
 4
 5
 6
 7
 8
 9
10
11
12
13
14
15
16
17
18
19
20
21
22
23
24
25
26
27
28
29
30
31
32
33
34
35
36
37
38
39
40
41
42
43
44
45
46
47
48
49
50
51
52
53
54
55
56
57
58
59
60
61
62
63
64
65
66
67
68
69
70
71
72
73
74
75
76
77
78
79
80
81
82
83
84
85
86
87
88
89
90
91
import android.app.Activity;
import android.os.Bundle;
import android.support.v7.widget.LinearLayoutManager;
import android.support.v7.widget.RecyclerView;
import android.view.LayoutInflater;
import android.view.View;
import android.view.ViewGroup;
import android.widget.TextView;


/**
 * Created by harshalbenake on 02/06/15.
 */
public class RecycleViewActivity extends Activity {
     RecyclerView mRecyclerView;
     RecyclerView.Adapter mAdapter;
     RecyclerView.LayoutManager mLayoutManager;
     String[] myDataset;
    @Override
    protected void onCreate(Bundle savedInstanceState) {
        super.onCreate(savedInstanceState);
        setContentView(R.layout.main_recycle_view);

        mRecyclerView = (RecyclerView) findViewById(R.id.my_recycler_view);
        // use this setting to improve performance if you know that changes
        // in content do not change the layout size of the RecyclerView
        mRecyclerView.setHasFixedSize(true);
        // use a linear layout manager
        mLayoutManager = new LinearLayoutManager(RecycleViewActivity.this);
        mRecyclerView.setLayoutManager(mLayoutManager);

        myDataset = new String[101];
        for (int i = 0; i < 101; i++)
        {
            myDataset[i] = String.format("Harshal Benake: "+i, i);
        }

        // specify an adapter
        mAdapter = new MyAdapter(myDataset);
        mRecyclerView.setAdapter(mAdapter);

    }

    public class MyAdapter extends RecyclerView.Adapter<MyAdapter.ViewHolder> {
        private String[] mDataset;

        // Provide a reference to the views for each data item
        // Complex data items may need more than one view per item, and
        // you provide access to all the views for a data item in a view holder
        public class ViewHolder extends RecyclerView.ViewHolder {
            // each data item is just a string in this case
            public TextView mTextView;
            public ViewHolder(View v) {
                super(v);
                mTextView=(TextView)v.findViewById(R.id.row_textView);
            }
        }

        // Provide a suitable constructor (depends on the kind of dataset)
        public MyAdapter(String[] myDataset) {
            mDataset = myDataset;
        }

        // Create new views (invoked by the layout manager)
        @Override
        public MyAdapter.ViewHolder onCreateViewHolder(ViewGroup parent,
                                                       int viewType) {
            // create a new view
            View view = LayoutInflater.from(parent.getContext()).inflate(R.layout.row_item, parent, false);

            // set the view's size, margins, paddings and layout parameters
            ViewHolder viewHolder = new ViewHolder(view);
            return viewHolder;
        }

        // Replace the contents of a view (invoked by the layout manager)
        @Override
        public void onBindViewHolder(ViewHolder holder, int position) {
            // - get element from your dataset at this position
            // - replace the contents of the view with that element
            holder.mTextView.setText(mDataset[position]);

        }

        // Return the size of your dataset (invoked by the layout manager)
        @Override
        public int getItemCount() {
            return mDataset.length;
        }
    }
}

main_recycle_view.xml
 1
 2
 3
 4
 5
 6
 7
 8
 9
10
11
<?xml version="1.0" encoding="utf-8"?>
<LinearLayout xmlns:android="http://schemas.android.com/apk/res/android"
    android:orientation="vertical" android:layout_width="match_parent"
    android:layout_height="match_parent">
    <!-- A RecyclerView with some commonly used attributes -->
    <android.support.v7.widget.RecyclerView
        android:id="@+id/my_recycler_view"
        android:scrollbars="none"
        android:layout_width="match_parent"
        android:layout_height="match_parent"/>
</LinearLayout>

row_item.xml
 1
 2
 3
 4
 5
 6
 7
 8
 9
10
11
12
13
14
15
16
<android.support.v7.widget.CardView xmlns:android="http://schemas.android.com/apk/res/android"
    xmlns:card_view="http://schemas.android.com/apk/res-auto"
    android:id="@+id/card_view"
    android:layout_width="match_parent"
    android:layout_height="wrap_content"
    android:layout_margin="10dp"
    card_view:cardCornerRadius="4dp">

    <TextView
        android:id="@+id/row_textView"
        android:layout_width="wrap_content"
        android:layout_height="wrap_content"
        android:layout_margin="10dp"
        android:elevation="2dp"
        android:text="New Text" />
</android.support.v7.widget.CardView>

build.gradle
 1
 2
 3
 4
 5
 6
 7
 8
 9
10
11
12
13
14
15
16
17
18
19
20
21
22
23
24
25
26
27
28
apply plugin: 'com.android.application'

android {
    compileSdkVersion 21
    buildToolsVersion "22.0.1"

    defaultConfig {
        applicationId "com.lollipopsupport_as"
        minSdkVersion 15
        targetSdkVersion 21
        versionCode 1
        versionName "1.0"
    }
    buildTypes {
        release {
            minifyEnabled false
            proguardFiles getDefaultProguardFile('proguard-android.txt'), 'proguard-rules.pro'
        }
    }
}

dependencies {
    compile fileTree(dir: 'libs', include: ['*.jar'])
    compile 'com.android.support:appcompat-v7:21.0.+'
    compile 'com.android.support:cardview-v7:21.0.+'
    compile 'com.android.support:recyclerview-v7:21.0.+'

}

Wednesday 22 July 2015

HB Blog 84: Comparing Android's Relative Layout With iOS Auto Layout.

I have been working on iOS's auto layout for a while and as an Android developer I found auto layout concept pretty similar to Android's relative layout. Both concept go with one single moto to arrange views or components with respect to other views or components depending on devices.

Arranging views on the screen:-
In Android, we have below examples of layouts to arrange views on the screen.
LinearLayout:-
It is a view group that aligns all children in a single direction, vertically or horizontally. You can specify the layout direction with the android:orientation attribute.
RelativeLayout:-
It is a view group that displays child views in relative positions. The position of each view can be specified as relative to sibling elements (such as to the left-of or below another view) or in positions relative to the parent RelativeLayout area (such as aligned to the bottom, left or center).

In iOS, we have concept of auto layout to arrange views on the screen.
Auto Layout:- 
It is a system that lets you lay out your app’s user interface by creating a mathematical description of the relationships between the elements. You define these relationships in terms of constraints either on individual elements, or between sets of elements. Using Auto Layout, you can create a dynamic and versatile interface that responds appropriately to changes in screen size, device orientation, and localization.

Basically, both Android as well as iOS prefer MVC(model-view-controller) pattern, and both use xml for view creation. The main theory behind arranging views on screen is to satisfy the view or component height, width, x and y co - ordinates.

Height and width of a view:-
In Android, we have layout params that describes how big the view wants to be for both width and height. The base LayoutParams class just describes how big the view wants to be for both width and height.
 For each dimension, it can specify one of:
    FILL_PARENT (renamed MATCH_PARENT in API Level 8 and higher), which means that the view wants to be as big as its parent (minus padding)
    WRAP_CONTENT, which means that the view wants to be just big enough to enclose its content (plus padding)
    an exact number

There are subclasses of LayoutParams for different subclasses of ViewGroup. For example, AbsoluteLayout has its own subclass of LayoutParams which adds an X and Y value.

In iOS, we have height and width constraints for each view. We can also use equal width and equal height constraint to make view width and height dependable equally on another view.

Now, for the main job is to satisfy x and y of a view.
In Android, linear layout aligns all children in a single direction, vertically or horizontally but, it is not efficient to create complex UI. So we have relative layout, where the positions of the children can be described in relation to each other or to the parent specified by ID.So you can align two elements by right border, or make one below another, centered in the screen, centered left, and so on. By default, all child views are drawn at the top-left of the layout. There are various properties that are available for the views inside relative layout.
  android:layout_alignParentTop
    If "true", makes the top edge of this view match the top edge of the parent.
android:layout_centerVertical
    If "true", centers this child vertically within its parent.
android:layout_below
    Positions the top edge of this view below the view specified with a resource ID.
android:layout_toRightOf

 Positions the left edge of this view to the right of the view specified with a resource ID.
In iOS, we have constraint to satisfy x and y of a view. An attribute is one of left, right, top, bottom, leading, trailing, width, height, centerX, centerY, and baseline. Leading and trailing defines the view to its left and right position with respect to the superview or adjacent view. The constraints such as left, right, top, bottom,etc specify respective position on adjacent view.
Comparing Android relative layout properties with iOS auto layout constraints:-
  1. The height and width of both views inside relative layout or views using auto layout are same.
  2. The auto layout constraint leading space & trailingspace are similar to relative layout properties android:layout_alignParentLeft="true" & android:layout_alignParentRight="true" to arrange view with respect to parent's edge whereas, android:layout_toLeftOf & android:layout_toRightOf with respect to child's edge.
  3. The auto layout constraint top space & bottom space are similar to relative layout properties android:layout_alignParentTop="true" & android:layout_alignParentBottom="true" to arrange view with respect to parent's edge.
  4. The auto layout constraint center horizontal space & center vertical space are similar to relative layout properties android:layout_centerHorizontal & android:layout_centerVertical to arrange view horizontally or vertically with respect to the bounds of its RelativeLayout parent.
  5. The auto layout constraint horizontal space & vertical space are similar to relative layout properties  android:layout_toLeftOf  & android:layout_below to arrange view at position respective to the given anchor view ID. 

Sunday 19 July 2015

HB Blog 83: Project Fi - Network Of Networks.

Project Fi is a program to deliver a fast, easy wireless experience in close partnership with leading carriers, hardware makers, and our users.

The Network:-
Networks change in quality as you move around. To help you get the highest-quality connection at your location, Project Fi uses new technology to intelligently connect you to the fastest network whether it's Wi-Fi or one of our partner LTE networks.

The Plan:-
It's hard to predict your data usage when it changes month to month. One month you're streaming live sports, the next you're mostly just checking email. At the end of each month, you’ll get your unused data credited in dollars and cents, so you only pay for what you use.

The Experience:-
Project Fi makes it easy to communicate in more places and use your number with all your devices.
Calls and texts over Wi-Fi for more coverage.
Calls transition seamlessly between Wi-Fi and cell networks.If you start a call over Wi-Fi and walk outside, Project Fi detects when your signal becomes weak and seamlessly moves your call over to a cell network to keep the conversation going.
Talk, text, and check voicemail with the screen nearest you. Your phone number now works with more than just your phone. Connect any device that supports Google Hangouts (Android, iOS, Windows, Mac, or Chromebook) to your number. Then, talk and text with anyone—it doesn't matter what device they're using.
How it works?
Project Fi is a network of networks. It makes sure you’re connected to the best possible network wherever you are. If you’re on Verizon’s network and Fi detects that Sprint has a stronger signal, you’ll be moved over to Sprint to give you the fastest available speed. Throughout a given day, you may be passed between two 4G LTE networks and various public WiFi hotspots.
Project Fi makes heavy use of WiFi, connecting your device to “free, open networks that do not require any action to get connected.” So, as you step into the range of a public WiFi network, you’ll be automatically connected - and when the signal begins to weaken, you’ll be passed back over to the fastest available cellular network. And all data sent through open WiFi hotspots is secured through encryption.

Google also wants to make you device-independent. With Project Fi, your phone number “lives in the cloud.” You can call and text over WiFi, and you can talk, text, and check voicemail using your phone number on just about any device - Android, iOS, Windows, Mac, or Chromebook.

Friday 10 July 2015

HB Blog 82: How To Extract Source Code From Android Apk???

Reverse engineering, also called back engineering, is the processes of extracting knowledge or design information from anything man-made and re-producing it or reproducing anything based on the extracted information. The process often involves disassembling something (a mechanical device, electronic component, computer program, or biological, chemical, or organic matter) and analyzing its components and workings in detail.

In this post, I will show how to extract source code (java and xml ) files from android apk.
To get the source code from APK file, we will need these tools:
1. Download dex2jar
2. Download java decompiler
3. Download apktool

Procedure for decoding .apk files, step-by-step method:
Step 1:
  1. Make a new folder and copy over the .apk file that you want to decode.
  2. Now rename the extension of this .apk file to .zip (e.g. rename from filename.apk to filename.zip) and save it. Now you can access the classes.dex files, etc. At this stage you are able to see drawables but not xml and java files, so continue.
Step 2:
  1. Now extract this .zip file in the same folder (or NEW FOLDER).
  2. Download dex2jar and extract it to the same folder (or NEW FOLDER).
  3. Move the classes.dex file into the dex2jar folder.
  4. Now open command prompt and change directory to that folder (or NEW FOLDER). Then write d2j-dex2jar classes.dex (for mac terminal or ubuntu write ./d2j-dex2jar.sh classes.dex) and press enter. You now have the classes.dex.dex2jar file in the same folder.
  5. Download java decompiler, double click on jd-gui, click on open file, and open classes.dex.dex2jar file from that folder: now you get class files.
  6. Save all of these class files (In jd-gui, click File -> Save All Sources) by src name. At this stage you get the java source but the .xml files are still unreadable, so continue.
 Step 3:
  1. Now open another new folder.
  2. Put in the .apk file which you want to decode.
  3. Download the latest version of apktool AND apktool install window (both can be downloaded from the same link) and place them in the same folder
  4. Download framework-res.apk and put it in the same folder (Not all apk file need this file)
  5. Open a command window
  6. Navigate to the root directory of APKtool and type the following command: apktool if framework-res.apk
  7. apktool d myApp.apk (where myApp.apk denotes the filename that you want to decode)
  8. Now you get a file folder in that folder and can easily read the apk's xml files. 
  9. Just copy the contents of both folder(in this case both new folder)to the single one.
Finally, you can enjoy the source code...

Sunday 5 July 2015

HB Blog 81: How To Share Screen From Android/iOS Devices To Your Computer?

Reflector is a wireless mirroring and streaming receiver that works great with Google Cast™, AirPlay™ and AirParrot. Mirror your content to the big screen without wires or complicated setups.

How to share screen from Android device to your computer?
Follow the steps below to share screen on Android device to your computer:
1. Be sure your device is connected to the same WiFi network as the computer that is running Reflector 2.
2. Launch Reflector 2 on your computer.
Download Reflector: - http://www.airsquirrels.com/reflector/download/
3. Launch the Chromecast app on your Android device.
Download Chromecast Android app: - https://play.google.com/store/apps/details?id=com.google.android.apps.chromecast.app
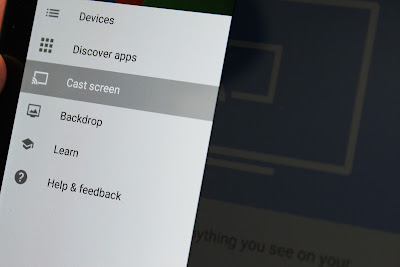
4. Open the menu at the top left of the screen in chromecast app.
5. Tap the "Cast Screen" menu.
6. You will be presented with a list of available devices for casting. Tap the name of your computer from this list, and you should now see your Android device casting to your computer screen.

How to share screen from iOS device to your computer?
Follow the steps below to share screen on iOS device to your computer:
1. Be sure your iOS device is on the same network as the computer that has Reflector 2 installed.
2. Launch Reflector 2 on your computer.
Download Reflector: - http://www.airsquirrels.com/reflector/download/
3. On your iOS device, swipe up from the bottom of the screen to bring up Control Center. 
4. AirPlay mirroring is built in on these devices. Tap on the AirPlay menu, and you should see a list of available devices.
5. Tap on your computer's name, then swipe the mirroring toggle switch found underneath the name of your computer.
6. Your iOS device should now be mirroring successfully to your computer.