Showing posts with label animation. Show all posts

Tuesday, 5 September 2023

Understanding the GLTF File Format: An Introduction to 3D Models.

In the realm of 3D modeling and rendering, file formats play a pivotal role in storing and exchanging digital representations of three-dimensional objects. One such format that has gained significant traction in recent years is GLTF (short for GL Transmission Format). This open standard file format has revolutionized the way 3D models are created, shared, and experienced across various platforms. In this blog post, we will explore what GLTF is, how it works, and why it has become a game-changer in the world of 3D graphics.

What is GLTF?

GLTF, pronounced as "gl-tiff" or "g-l-t-f," is a file format designed for the efficient transmission and loading of 3D models and scenes. It is developed by the Khronos Group, a consortium of companies and organizations that work together to create open standards for 3D graphics, including WebGL and Vulkan. The primary goal of GLTF is to streamline the process of sharing and rendering 3D content across different platforms and devices.

How Does GLTF Work?

1. JSON and Binary Variants:

One of the standout features of GLTF is its support for two file variants: JSON (.gltf) and Binary (.glb). Let's briefly explore both:

  • JSON Variant: The JSON variant is a human-readable text file that describes the 3D model's structure, materials, textures, and animations. This file contains all the necessary information to recreate the 3D scene. While it is more accessible for developers and debugging, it tends to be larger in size compared to the binary format.
  • Binary Variant (GLB): The binary variant is a compact, binary-encoded file that packages all the data needed for the 3D model in a single file, including geometry, textures, shaders, and animations. GLB files are more efficient for transmission and loading and are often preferred for production use.

2. Geometry Compression:

To reduce the file size, GLTF supports geometry compression through technologies like Draco. This allows 3D models to be transmitted and rendered with minimal impact on performance and loading times. Smaller file sizes are especially crucial for web-based applications and augmented/virtual reality experiences.

3. PBR Materials:

GLTF supports physically-based rendering (PBR) materials. PBR materials mimic the behavior of real-world materials, allowing for more realistic and visually appealing 3D models. This includes parameters for base color, metallic, roughness, normal maps, and more, ensuring that objects in the 3D scene respond realistically to lighting conditions.

4. Animation Support:

GLTF includes support for animations and skeletal animations. This means that you can create complex, dynamic 3D scenes with moving objects, characters, and interactive elements.

Why GLTF Matters:

  • Interoperability: GLTF's open standard makes it easy to exchange 3D models between different software applications, platforms, and devices. This has resulted in widespread adoption across the industry.
  • Efficiency: With its compact binary format and support for geometry compression, GLTF files load quickly, making them ideal for web-based applications and mobile devices.
  • Realism: PBR materials and animation support enable developers to create more lifelike and immersive 3D experiences.
  • Community Support: GLTF has a growing and active community, which means there are plenty of tools, libraries, and resources available for creators and developers.
  • Web Compatibility: GLTF is well-suited for web-based applications and is supported by major web browsers, making it an excellent choice for building 3D experiences on the web.

Conclusion

In the ever-evolving world of 3D graphics, the GLTF file format stands out as a powerful, open standard for efficiently transmitting and rendering 3D models and scenes. Its versatility, efficiency, and support for modern rendering techniques have made it a preferred choice for a wide range of applications, from video games to architectural visualization and web-based experiences. As technology continues to advance, GLTF is likely to play an even more significant role in shaping the future of 3D content creation and consumption. 

Saturday, 15 July 2017

HB Blog 140: Horizontal ListView In Android.

HorizontalListView is an Android List-view widget which scrolls in a horizontal manner (in contrast with the SDK-provided List View which scrolls vertically).

Basically, we extends Linear layout and use it as a container for views such as text view. This can be used as normal list view where selection and other list operations can be controlled via tagging the views with array positions.

Below is an tutorial, where I have added 10 list view items as text view in linear layout and created a custom class CustomHorizontalListView which can be used as an API for HorizontalListViewin Android.
Refer the below link for complete sample code:-

Download Sample Code

Have a look on few code snippets,

//custom_horizontallistview.xml
 1
 2
 3
 4
 5
 6
 7
 8
 9
10
11
12
13
14
<?xml version="1.0" encoding="utf-8"?>
<HorizontalScrollView xmlns:android="http://schemas.android.com/apk/res/android"
    android:layout_width="match_parent"
    android:scrollbars="none"
    android:layout_height="wrap_content">

    <LinearLayout
        android:id="@+id/ll_contatinerlistview"
        android:layout_width="wrap_content"
        android:layout_height="wrap_content"
        android:layout_marginLeft="5dp"
        android:layout_marginRight="5dp"
        android:orientation="horizontal"/>
</HorizontalScrollView>

//activity_main.xml
 1
 2
 3
 4
 5
 6
 7
 8
 9
10
11
12
13
<?xml version="1.0" encoding="utf-8"?>
<RelativeLayout xmlns:android="http://schemas.android.com/apk/res/android"
    xmlns:app="http://schemas.android.com/apk/res-auto"
    xmlns:tools="http://schemas.android.com/tools"
    android:layout_width="match_parent"
    android:layout_height="match_parent">
<com.harshalbenake.horizontallistview.views.CustomHorizontalListView
    android:id="@+id/customhorizontallistview"
    android:layout_width="match_parent"
    android:layout_margin="5dp"
    android:layout_height="match_parent"/>

</RelativeLayout>

//CustomHorizontalListView.java
  1
  2
  3
  4
  5
  6
  7
  8
  9
 10
 11
 12
 13
 14
 15
 16
 17
 18
 19
 20
 21
 22
 23
 24
 25
 26
 27
 28
 29
 30
 31
 32
 33
 34
 35
 36
 37
 38
 39
 40
 41
 42
 43
 44
 45
 46
 47
 48
 49
 50
 51
 52
 53
 54
 55
 56
 57
 58
 59
 60
 61
 62
 63
 64
 65
 66
 67
 68
 69
 70
 71
 72
 73
 74
 75
 76
 77
 78
 79
 80
 81
 82
 83
 84
 85
 86
 87
 88
 89
 90
 91
 92
 93
 94
 95
 96
 97
 98
 99
100
101
102
103
104
105
106
107
108
109
110
111
112
113
114
115
116
117
118
119
120
121
package com.harshalbenake.horizontallistview.views;

import android.content.Context;
import android.content.res.TypedArray;
import android.graphics.Color;
import android.util.AttributeSet;
import android.view.Gravity;
import android.view.View;
import android.view.ViewGroup;
import android.widget.LinearLayout;
import android.widget.TextView;


import com.harshalbenake.horizontallistview.R;

import java.util.ArrayList;

/**
 * This class is used for custom HorizontalListView.
 */
public class CustomHorizontalListView extends LinearLayout {
    private Context mContext;
    private LinearLayout mll_contatinerlistview;
    private ArrayList<String> mItemSelectedArray;
    private String mItemArray[];
    public CustomHorizontalListView(Context context) {
        super(context);
        this.mContext = context;
        initlayout();
    }

    public CustomHorizontalListView(Context context, AttributeSet attrs) {
        super(context, attrs);
        this.mContext = context;
        initlayout();
    }

    public CustomHorizontalListView(Context context, AttributeSet attrs, int defStyle) {
        super(context, attrs, defStyle);
        this.mContext = context;
        initlayout();
    }

    /**
     * initialize Layout
     */
    private void initlayout() {
        View rootView = inflate(mContext, R.layout.custom_horizontallistview, this);
        mll_contatinerlistview = (LinearLayout) rootView.findViewById(R.id.ll_contatinerlistview);
        mItemSelectedArray = new ArrayList<>();
    }

    /**
     * sets Lables
     * @param itemArray
     **/
    public void setListItems(String[] itemArray) {
        mItemArray=itemArray;
        for (int listItemsIndex = 0; listItemsIndex < itemArray.length; listItemsIndex++) {
            TextView view = new TextView(mContext);
            view.setId(listItemsIndex);
            view.setTag(itemArray[listItemsIndex]);
            view.setText(itemArray[listItemsIndex]);
            view.setBackgroundColor(Color.GRAY);
            view.setOnClickListener(new CustomOnClickListener());
            LayoutParams layoutParamsTextView = new LayoutParams(75, 500);
            layoutParamsTextView.setMargins(10,10,10,10);
            view.setGravity(Gravity.CENTER);
            view.setLayoutParams(layoutParamsTextView);
            mll_contatinerlistview.addView(view);
        }
    }

    /**
     * Custom On Click Listener
     */
    class CustomOnClickListener implements OnClickListener {

        public CustomOnClickListener() {
        }

        @Override
        public void onClick(View view) {
            int viewID = view.getId();
            String viewTag = view.getTag().toString();
            resetAllColors((ViewGroup)view.getParent());
            view.setBackgroundColor(Color.GREEN);
            mItemSelectedArray.clear();
            mItemSelectedArray.add(viewTag);
        }
    }

    public void resetAllColors(ViewGroup group)
    {
        for(int i = 0; i< mItemArray.length; i++){
            View view = group.getChildAt(i);
            view.setBackgroundColor(Color.GRAY);
        }
    }

    /**
     * selectd Item By Tag
     */
    public void selectItemByTag(String strTag){
        for(int i = 0; i< mItemArray.length; i++) {
            View view = mll_contatinerlistview.getChildAt(i);
            if(view.getTag().toString().equalsIgnoreCase(strTag)){
                view.setBackgroundColor(Color.GREEN);
                view.setSelected(true);
            }
        }
    }

    /**
     * gets Item Selected Array
     * @return
     */
    public ArrayList<String> getListItemsArray(){
        return mItemSelectedArray;
    }
}

//MainActivity.java  

 1
 2
 3
 4
 5
 6
 7
 8
 9
10
11
12
13
14
15
16
17
18
package com.harshalbenake.horizontallistview;

import android.support.v7.app.AppCompatActivity;
import android.os.Bundle;
import com.harshalbenake.horizontallistview.views.CustomHorizontalListView;

public class MainActivity extends AppCompatActivity {

    @Override
    protected void onCreate(Bundle savedInstanceState) {
        super.onCreate(savedInstanceState);
        setContentView(R.layout.activity_main);

        CustomHorizontalListView customhorizontallistview=(CustomHorizontalListView)findViewById(R.id.customhorizontallistview);
        String itemArray[]={"1","2","3","4","5","6","7","8","9","10"};
        customhorizontallistview.setListItems(itemArray);
    }
}

Monday, 15 May 2017

HB Blog 135: Android Vertical Seekbar Tutorial.

Android and all mobile technologies are changing very rapidly and users need more attractive and new kinda control views. Most of us do get bored with same things everywhere.
A SeekBar is an extension of ProgressBar that adds a draggable thumb. The user can touch the thumb and drag left or right to set the current progress level or use the arrow keys.

But, lets say we need a seekbar view, a custom view which can progress by dragging thumb top or bottom for changing progress level. In these post, I will show how to create custom vertical seekbar in Android.

Refer the below link for complete sample code:-

Download Sample Code

Have a look on few code snippets,

//CustomVerticalSeekbar.java
 1
 2
 3
 4
 5
 6
 7
 8
 9
10
11
12
13
14
15
16
17
18
19
20
21
22
23
24
25
26
27
28
29
30
31
32
33
34
35
36
37
38
39
40
41
42
43
44
45
46
47
48
49
50
51
52
53
54
55
56
57
58
59
60
61
62
63
64
65
66
67
68
69
70
package com.harshalbenake.verticalseekbar.views;


import android.content.Context;
import android.graphics.Canvas;
import android.util.AttributeSet;
import android.view.MotionEvent;
import android.widget.SeekBar;

public class CustomVerticalSeekbar extends SeekBar {
    public CustomVerticalSeekbar(Context context) {
        super(context);
    }

    public CustomVerticalSeekbar(Context context, AttributeSet attrs, int defStyle) {
        super(context, attrs, defStyle);
    }

    public CustomVerticalSeekbar(Context context, AttributeSet attrs) {
        super(context, attrs);
    }

    protected void onSizeChanged(int w, int h, int oldw, int oldh) {
        super.onSizeChanged(h, w, oldh, oldw);
    }

    @Override
    public synchronized void setProgress(int progress) // it is necessary for
    // calling setProgress
    // on click of a button
    {
        super.setProgress(progress);
        onSizeChanged(getWidth(), getHeight(), 0, 0);
    }

    @Override
    protected synchronized void onMeasure(int widthMeasureSpec,
                                          int heightMeasureSpec) {
        super.onMeasure(heightMeasureSpec, widthMeasureSpec);
        setMeasuredDimension(getMeasuredHeight(), getMeasuredWidth());
    }

    protected void onDraw(Canvas c) {
        c.rotate(-90);
        c.translate(-getHeight(), 0);

        super.onDraw(c);
    }

    @Override
    public boolean onTouchEvent(MotionEvent event) {
        if (!isEnabled()) {
            return false;
        }

        switch (event.getAction()) {
            case MotionEvent.ACTION_DOWN:
            case MotionEvent.ACTION_MOVE:
            case MotionEvent.ACTION_UP:
                setProgress(getMax()
                        - (int) (getMax() * event.getY() / getHeight()));
                onSizeChanged(getWidth(), getHeight(), 0, 0);
                break;

            case MotionEvent.ACTION_CANCEL:
                break;
        }
        return true;
    }
}

//MainActivity.java
 1
 2
 3
 4
 5
 6
 7
 8
 9
10
11
12
13
14
15
16
17
18
19
20
21
22
23
24
25
26
27
28
29
30
31
32
33
34
package com.harshalbenake.verticalseekbar;

import android.app.Activity;
import android.os.Bundle;
import android.widget.SeekBar;

import com.harshalbenake.verticalseekbar.views.CustomVerticalSeekbar;

public class MainActivity extends Activity {

    @Override
    protected void onCreate(Bundle savedInstanceState) {
        super.onCreate(savedInstanceState);
        setContentView(R.layout.activity_main);

        CustomVerticalSeekbar customVerticalSeekbar=(CustomVerticalSeekbar)findViewById(R.id.customverticalseekbar);
        customVerticalSeekbar.setOnSeekBarChangeListener(new SeekBar.OnSeekBarChangeListener() {
            @Override
            public void onProgressChanged(SeekBar seekBar, int progress, boolean userAction) {

            }

            @Override
            public void onStartTrackingTouch(SeekBar seekBar) {

            }

            @Override
            public void onStopTrackingTouch(SeekBar seekBar) {

            }
        });
    }
}

//activity_main.xml
 1
 2
 3
 4
 5
 6
 7
 8
 9
10
11
12
13
<?xml version="1.0" encoding="utf-8"?>
<LinearLayout xmlns:android="http://schemas.android.com/apk/res/android"
    xmlns:tools="http://schemas.android.com/tools"
    android:layout_width="match_parent"
    android:layout_height="match_parent"
    android:background="@android:color/black"
    android:gravity="center_horizontal">

    <com.harshalbenake.verticalseekbar.views.CustomVerticalSeekbar
        android:id="@+id/customverticalseekbar"
        android:layout_width="wrap_content"
        android:layout_height="match_parent" />
</LinearLayout>

Monday, 1 May 2017

HB Blog 134: Improve Android Applications Performance.

Hey guys, I hope you liked my previous post on app performance HB Blog 132: Does Your Phone Get Hang? Know Why...  . I got few mails and suggestions for posting similar kind of posts. So, here is my one more post for optimize your app's performance in various ways to improve its responsiveness and battery efficiency.
Basically, user expects app to launch app faster as well as load UI without any glitches. App launch can take place in one of three states, each affecting how long it takes for your app to become visible to the user: cold start, warm start, and lukewarm start. In a cold start, your app starts from scratch. In the other states, the system needs to bring the app from the background to the foreground.
At the beginning of a state, the system has three tasks. These tasks are:
  1.     Loading and launching the app.
  2.     Displaying a blank starting window for the app immediately after launch.
  3.     Creating the app process.
As soon as the system creates the app process, the app process is responsible for the next stages. These stages are:
  1.     Creating the app object.
  2.     Launching the main thread.
  3.     Creating the main activity.
  4.     Inflating views.
  5.     Laying out the screen.
  6.     Performing the initial draw.
There are few safety measures we can take for improving application performance such as,
  1. Remove unused resource IDs:- We often declare and find a view using android:id="@+id/view". But, while actual calling it in java classes is not needed. Sometimes, we don't need any changes in that particular view so e can avoid creating this ids. Because, these ids are creating public static final constant variable which are taking up unneeded memory.
  2. Remove unused resource:- Many times we keep on changing UI/UX so in that case we might add up resource but won't remove it once they are unused, so try to remove unused resource it may be images, icons as well as layout and other XML.
  3. Minimize load on onCreate():-  When your application launches, the blank starting window remains on the screen until the system finishes drawing the app for the first time. At that point, the system process swaps out the starting window for your app, allowing the user to start interacting with the app. If you’ve overloaded Application.oncreate() in your own app, the system invokes the onCreate() method on your app object. Afterwards, the app spawns the main thread, also known as the UI thread, and tasks it with creating your main activity. From Android 4.4 (API level 19), logcat includes an output line containing a value called Displayed. This value represents the amount of time elapsed between launching the process and finishing drawing the corresponding activity on the screen. We understand that which activity is taking more time for loading and using tools like Method Tracer, Inline Tracer, etc. It also gives which methods are the culprits, most of the time it is onCreate() method. We need to optimize the load of these method by initializing resource that are needed at startup itself. We can also use methods such as reportFullyDrawn() to let the system know that your activity is finished with its lazy loading.
  4. Use injection framework like Dagger:- Whether the problem lies with unnecessary initialization or disk I/O, the solution calls for lazy-initializing objects: initializing only those objects that are immediately needed. We can have a dependency injection framework like Dagger that creates objects and dependencies are when they are injected for the first time.
  5. Use Asynchronous operation:- Using a background thread ("worker thread") removes strain from the main thread so it can focus on drawing the UI. In many cases, using AsyncTask provides a simple way to perform your work outside the main thread. AsyncTask automatically queues up all the execute() requests and performs them serially. This behavior is global to a particular process and means you don’t need to worry about creating your own thread pool. For background database operations we can use compile statements can be used. Have a look on similar post for more information, HB Blog 95: How To Compile SQL Statement Into Reusable Pre-compiled Statement Object???
  6. Avoid Virtualization:- If you don't need to access an object's fields, make your method static. Invocations will be about 15%-20% faster. It's also good practice, because you can tell from the method signature that calling the method can't alter the object's state. In native languages like C++ it's common practice to use getters (i = getCount()) instead of accessing the field directly (i = mCount). This is an excellent habit for C++ and is often practiced in other object oriented languages like C# and Java, because the compiler can usually inline the access, and if you need to restrict or debug field access you can add the code at any time. However, this is a bad idea on Android. Virtual method calls are expensive, much more so than instance field lookups. It's reasonable to follow common object-oriented programming practices and have getters and setters in the public interface, but within a class you should always access fields directly.
  7. Use Enhanced For Loop Syntax:- The enhanced for loop (also sometimes known as "for-each" loop) can be used for collections that implement the Iterable interface and for arrays. There are several alternatives for iterating through an array:
     1
     2
     3
     4
     5
     6
     7
     8
     9
    10
    11
    12
    13
    14
    15
    16
    17
    18
    19
    20
    21
    22
    23
    24
    25
    26
    27
    28
    29
    static class Foo {
        int mSplat;
    }
    
    Foo[] mArray = ...
    
    public void zero() {
        int sum = 0;
        for (int i = 0; i < mArray.length; ++i) {
            sum += mArray[i].mSplat;
        }
    }
    
    public void one() {
        int sum = 0;
        Foo[] localArray = mArray;
        int len = localArray.length;
    
        for (int i = 0; i < len; ++i) {
            sum += localArray[i].mSplat;
        }
    }
    
    public void two() {
        int sum = 0;
        for (Foo a : mArray) {
            sum += a.mSplat;
        }
    }
    

    • zero() is slowest, because the JIT can't yet optimize away the cost of getting the array length once for every iteration through the loop. 
    • one() is faster. It pulls everything out into local variables, avoiding the lookups. Only the array length offers a performance benefit. 
    • two() is fastest for devices without a JIT, and indistinguishable from one() for devices with a JIT. It uses the enhanced for loop syntax introduced in version 1.5 of the Java programming language.
  8. Avoid complex Layout Hierarchies:- Layouts are a key part of Android applications that directly affect the user experience. If implemented poorly, your layout can lead to a memory hungry application with slow UIs. The Android SDK includes tools to help you identify problems in your layout performance, which will help to implement smooth scrolling interfaces with a minimum memory footprint. In the same way a complex web page can slow down load time, your layout hierarchy if too complex can also cause performance problems. If your application UI repeats certain layout constructs in multiple places, you can use the <include/> and <merge/> tags to embed another layout inside the current layout. Beyond simply including one layout component within another layout, you might want to make the included layout visible only when it's needed, sometime after the activity is running. Deferring loading resources is an important technique to use when you have complex views that your app might need in the future. You can implement this technique by defining a ViewStub for those complex and rarely used views.
  9. Use View Holder for listview:- Listview is one of the most important and very excessively used view. The key to a smoothly scrolling ListView is to keep the application’s main thread (the UI thread) free from heavy processing. Ensure you do any disk access, network access, or SQL access in a separate thread. The key to a smoothly scrolling ListView is to keep the application’s main thread (the UI thread) free from heavy processing. Ensure you do any disk access, network access, or SQL access in a separate thread. A way around repeated use of findViewById() is to use the "view holder" design pattern. A ViewHolder object stores each of the component views inside the tag field of the Layout, so you can immediately access them without the need to look them up repeatedly.
  10. Use 3rd party libraries carefully:- Actually, we use available libraries and resources for fasten our development time. It might not work as expected all the time and not all the design patterns and precautions are followed in these kinda libraries. So do explore complete libraries and then go for it. Android Arsenal is one of the interesting and helpful site which has categorized directory of libraries and tools for Android.

Saturday, 15 April 2017

HB Blog 133: Loader View Library For Android.

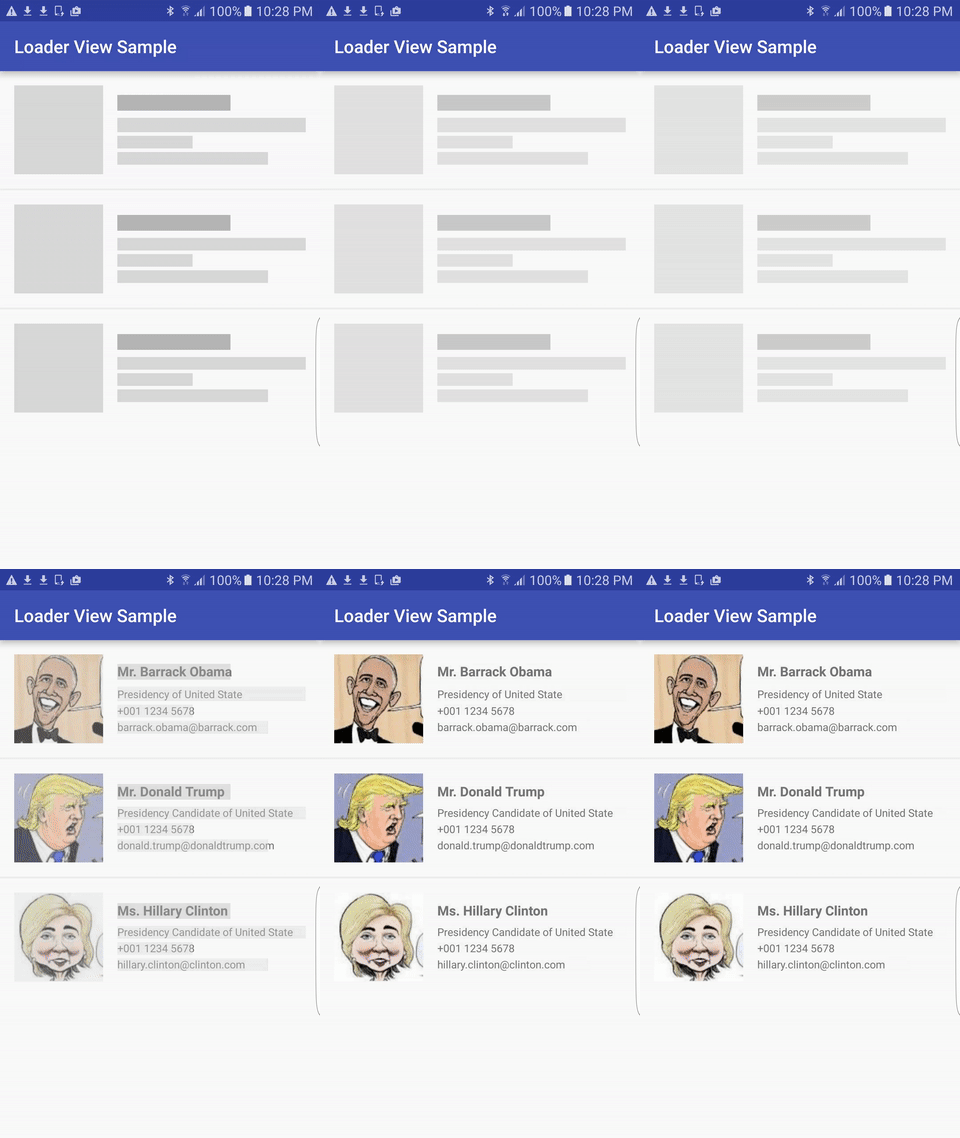
Now-a-days, people find animations and graphics pretty interesting. Mobile animations not only give an attractive user experience but, they also make the data loading process bearable for users. Users find progress bars, and loaders bit boring which make them loose interest in an application. There are many ways to handle these kinda problems.

In these post, I will show how to use a library for providing animations while loading data without user getting bored. These library is been developed to provide both TextView and ImageView the ability to show shimmer (animation loader) before any text or image is shown. Useful when waiting for data to be loaded from the network.

Refer the below link for complete sample code:-

Download Sample Code

Have a look on few code snippets,

//build.gradle
1
2
3
dependencies {
    compile 'com.elyeproj.libraries:loaderviewlibrary:1.3.0'
}

//activity_main.xml
 1
 2
 3
 4
 5
 6
 7
 8
 9
10
11
12
13
14
15
16
17
18
19
20
21
22
23
24
25
26
27
28
29
30
31
32
33
34
35
36
37
38
39
40
41
42
43
44
45
46
47
48
49
50
51
52
53
54
55
56
57
58
59
60
61
62
63
64
65
66
67
68
69
70
71
72
73
74
75
76
77
78
79
<?xml version="1.0" encoding="utf-8"?>
<LinearLayout xmlns:android="http://schemas.android.com/apk/res/android"
    xmlns:app="http://schemas.android.com/apk/res-auto"
    xmlns:tools="http://schemas.android.com/tools"
    android:layout_width="match_parent"
    android:layout_height="wrap_content"
    android:orientation="vertical">

    <RelativeLayout
        android:layout_width="match_parent"
        android:layout_margin="5dp"
        android:layout_height="wrap_content">

        <com.elyeproj.loaderviewlibrary.LoaderImageView
            android:id="@+id/image_icon"
            android:layout_width="100dp"
            android:layout_height="100dp"
            android:layout_marginEnd="16dp"
            android:layout_marginRight="16dp"
            app:use_gradient="true" />

        <LinearLayout
            android:id="@+id/container_text"
            android:layout_width="match_parent"
            android:layout_height="wrap_content"
            android:layout_centerVertical="true"
            android:layout_toEndOf="@id/image_icon"
            android:layout_toRightOf="@id/image_icon"
            android:orientation="vertical">

            <com.elyeproj.loaderviewlibrary.LoaderTextView
                android:id="@+id/txt_name"
                android:layout_width="match_parent"
                android:layout_height="wrap_content"
                android:textSize="@dimen/title_font_size"
                android:textStyle="bold"
                app:height_weight="0.8"
                app:use_gradient="true"
                app:width_weight="0.6" />

            <com.elyeproj.loaderviewlibrary.LoaderTextView
                android:id="@+id/txt_title"
                android:layout_width="match_parent"
                android:layout_height="wrap_content"
                android:layout_marginTop="8dp"
                android:textSize="@dimen/standard_font_size"
                app:height_weight="0.8"
                app:width_weight="1.0" />

            <com.elyeproj.loaderviewlibrary.LoaderTextView
                android:id="@+id/txt_phone"
                android:layout_width="match_parent"
                android:layout_height="wrap_content"
                android:layout_marginTop="4dp"
                android:textSize="@dimen/standard_font_size"
                app:height_weight="0.8"
                app:width_weight="0.4" />

            <com.elyeproj.loaderviewlibrary.LoaderTextView
                android:id="@+id/txt_email"
                android:layout_width="match_parent"
                android:layout_height="wrap_content"
                android:layout_marginTop="4dp"
                android:textSize="@dimen/standard_font_size"
                app:height_weight="0.8"
                app:width_weight="0.9" />

        </LinearLayout>

    </RelativeLayout>

    <Button
        android:id="@+id/btn_reset"
        android:layout_width="match_parent"
        android:layout_height="wrap_content"
        android:layout_margin="@dimen/activity_vertical_margin"
        android:onClick="resetLoader"
        android:text="Reset" />
</LinearLayout>

//MainActivity.java
 1
 2
 3
 4
 5
 6
 7
 8
 9
10
11
12
13
14
15
16
17
18
19
20
21
22
23
24
25
26
27
28
29
30
31
32
33
34
35
36
37
38
39
40
41
42
43
44
45
46
47
48
49
50
51
52
53
54
55
56
57
58
59
60
61
62
63
64
65
66
67
68
69
70
71
72
73
package com.example.harshalbenake.loaderviewanimation;

import android.os.AsyncTask;
import android.os.Bundle;
import android.support.v7.app.AppCompatActivity;
import android.view.View;
import android.widget.ImageView;
import android.widget.TextView;

import com.elyeproj.loaderviewlibrary.LoaderImageView;
import com.elyeproj.loaderviewlibrary.LoaderTextView;

public class MainActivity extends AppCompatActivity {

    private int WAIT_DURATION = 5000;
    private DummyWait dummyWait;

    @Override
    protected void onCreate(Bundle savedInstanceState) {
        super.onCreate(savedInstanceState);
        setContentView(R.layout.activity_main);
        loadData();
    }

    private void loadData() {
        if (dummyWait != null) {
            dummyWait.cancel(true);
        }
        dummyWait = new DummyWait();
        dummyWait.execute();
    }

    private void postLoadData() {
        ((TextView)findViewById(R.id.txt_name)).setText("Harshal Benake");
        ((TextView)findViewById(R.id.txt_title)).setText("Android Dev");
        ((TextView)findViewById(R.id.txt_phone)).setText("7588871488");
        ((TextView)findViewById(R.id.txt_email)).setText("harshalbenake@gmail.com");
        ((ImageView)findViewById(R.id.image_icon)).setImageResource(R.drawable.ic_launcher);
    }

    public void resetLoader(View view) {
        ((LoaderTextView)findViewById(R.id.txt_name)).resetLoader();
        ((LoaderTextView)findViewById(R.id.txt_title)).resetLoader();
        ((LoaderTextView)findViewById(R.id.txt_phone)).resetLoader();
        ((LoaderTextView)findViewById(R.id.txt_email)).resetLoader();
        ((LoaderImageView)findViewById(R.id.image_icon)).resetLoader();
        loadData();
    }

    class DummyWait extends AsyncTask<Void, Void, Void> {
        @Override
        protected void onPreExecute() {
            super.onPreExecute();
        }

        @Override
        protected Void doInBackground(Void... params) {
            try {
                Thread.sleep(WAIT_DURATION);
            } catch (InterruptedException e) {
                e.printStackTrace();
            }
            return null;
        }

        @Override
        protected void onPostExecute(Void result) {
            super.onPostExecute(result);
            postLoadData();
        }
    }

}

Monday, 21 July 2014

HB Blog 4: View pager animation using page transformation for Android.

Viewpager:-

 Layout manager that allows the user to flip left and right through pages of data. You supply an implementation of a PagerAdapter to generate the pages that the view shows.
ViewPager is most often used in conjunction with Fragment, which is a convenient way to supply and manage the lifecycle of each page. There are standard adapters implemented for using fragments with the ViewPager, which cover the most common use cases. These are FragmentPagerAdapter and FragmentStatePagerAdapter; each of these classes have simple code showing how to build a full user interface with them.

For more information regarding view pager follow below link:-
 http://developer.android.com/reference/android/support/v4/view/ViewPager.html

View pager animation for pages transition using page transformation:-

It is pretty simple,

1)Create viewpager and its pager adapter.Follow below code snippet  or refer above viewpager link.


1
2
3
4
5
//view pager instance...
final ViewPager viewPager = (ViewPager)findViewById(R.id.myViewPager);
viewPager.setAdapter(pageAdapter);
//your page adapter instance...
MyPagerAdapter pageAdapter = new MyPagerAdapter(getSupportFragmentManager()
2)Now, just attach a PageTransformer to the ViewPage.


1
2
3
4
5
6
7
viewPager.setPageTransformer(false, new PageTransformer() {
            @Override
            public void transformPage(View page, float position) {
                        // do transformation here
            }
        });
    } 
3)Find out few below examples.


 1
 2
 3
 4
 5
 6
 7
 8
 9
10
//For Alpha Transformation:-

 viewPager.setPageTransformer(false, new PageTransformer() {
 @Override
            public void transformPage(View page, float position) {
                /**ALPHA TRANSFORMATION**/
                final float normalizedposition = Math.abs(Math.abs(position) - 1);
                page.setAlpha(normalizedposition);
            }
        });

 1
 2
 3
 4
 5
 6
 7
 8
 9
10
11
//For Scaling Transformation:-

 viewPager.setPageTransformer(false, new PageTransformer() {
            @Override
            public void transformPage(View page, float position) {
                /**SCALING TRANSFORMATION**/
                final float normalizedposition = Math.abs(Math.abs(position) - 1);
                page.setScaleX(normalizedposition / 2 + 0.5f);
                page.setScaleY(normalizedposition / 2 + 0.5f);
            }
        });


1
2
3
4
5
6
7
8
9
//For Rotation Transformation:-

viewPager.setPageTransformer(false, new PageTransformer() {
            @Override
            public void transformPage(View page, float position) {
                /**ROATAION TRANSFORMATION**/
                page.setRotationY(position * -30);
            }
        });


4)Happy coding :)

Refer the below link for complete sample code:-
Download Sample Code
Download Apk File