Showing posts with label IP. Show all posts

Wednesday, 1 March 2017

HB Blog 130: How To Scan Network With Nmap GUI.

Nmap is popular network scanner software that can actively probe a particular host or a network to infer in-depth information about them. Nmap can conduct host discovery, service detection, OS version identification, port scanning, network stack fingerprinting, etc. It will help you to discover hosts, protocols, open ports, services and its configuration and vulnerabilities on networks. While Nmap itself is a command-line utility, you can run it along with its GUI front-end called Zenmap. Network Mapper is an Android frontend for well known Nmap scanner. Frontend will help you to download and install Nmap as well as use it. Frontend supports all known Android architectures: arm, mips and x86. Nmap binaries are transferred using HTTPS by default.

In this tutorial, I will describe how to scan particular hosts or networks by using Nmap GUI.
The following screenshot shows the main window of Zenmap.
Scan Particular Host(s):-
Using Zenmap interface, you can probe a particular host. Fill in the IP address or host name of a destination host in "Target" field, and choose a desired scan profile from "Profile" drop down menu. Then, click on "Scan" button. For multiple hosts, you can specify them in a comma-separated list.
To check the detailed system information of a particular host after scanning, highlight a host in the left panel, and click on "Host Details" tab on the right panel.
To view available services and open ports of a host, click on "Ports / Hosts" tab.
Scan an Entire Network:-
Zenmap can also probe an entire local network by specifying an address prefix (e.g., 192.168.1.0/24) in the "Target" field.
Once network scanning is completed, you can view the topology of discovered hosts by clicking on "Topology" tab.
To view a list of available services, click on "Services" button on the left panel. You can see a list of all discovered services and their associated hosts, as shown below.

Friday, 4 September 2015

HB Blog 92: ProRAT - Remote Administration Tool.

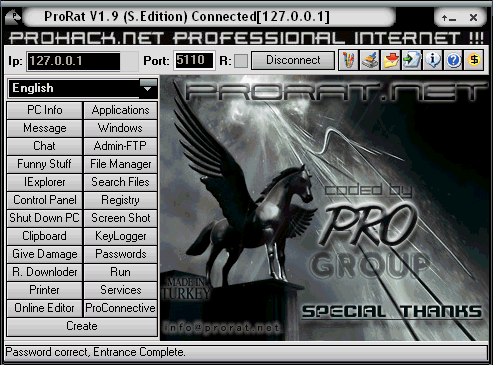
ProRat is a Remote Administration Tool made by PRO Group. It was written in C programming language and its capable to work with all windows operating systems. It is made for remoting your own computers from other computers. It is a Microsoft Windows based backdoor trojan horse, more commonly known as a RAT (Remote Administration Tool). As with other trojan horses it uses a client and server. It opens a port on the computer which allows the client to perform numerous operations on the server (the machine being controlled).
Features of ProRAT:-
ProRat allows many malicious actions on the victim's machine. Some of its abilities include:
    Logging keystrokes
    Full control over files
    Drive formatting
    Open/close CD tray
    Hide taskbar, desktop, and start button
    Writing on-screen
    Movement of cursor
    Feed the cat
    Take screenshots
    View system information
    View webcam
    Download & run files
    Password Protect your bound server from being used by anyone else
It also has a server creator which features that allow it to be undetected by antivirus and firewall software, and also allow it to stealthily run in the background.

How to remotely control computers using ProRAT: -
  1. Download ProRat. Once it is downloaded right click on the folder and choose to extract it, antivirus will detect it as trojan but it is a false positive detection. Open up the program.
  2. Next create the actual Trojan file. Click on Create and choose Create ProRat Server.
  3. Next put in your IP address so the server could connect to you. If you don’t know your IP address click on the little arrow to have it filled in for you automatically. Next put in your e-mail so that when and if a victim gets infected it will send you a message.
  4. Click on the General Settings button to continue. Choose the server port the program will connect through, the password you will be asked to enter when the victim is infected and you wish to connect with them, and the victim name. You can see ProRat has the ability to disable the windows firewall and hide itself from being displayed in the task manager.
  5. Click on the Bind with File button to continue. Here you will have the option to bind the trojan server file with another file. Remember a trojan can only be executed if a human runs it. So by binding it with a legitimate file like a text document or a game, the chances of someone clicking it go up. Check the bind option and select a file to bind it to.
  6. Click on the Server Extensions button to continue. Choose what kind of server file togenerate. Mostly exe’s looks suspicious so it would be smart to change it. Click on Server Icon to continue. Here you will choose an icon for your server file to have. The icons help mask what the file actually is.
  7. Finally click on Create Server to, you guessed it, create the server file.
  8. Once the trojan runs on victims computer the attacker would then get a message telling him that victim was infected. He would then connect to computer by typing in my IP address, port and clicking Connect. He will be asked for the password that he made when he created the server. Once he types it in, he will be connected to victims computer and have full controlover it.
How to protect/secure computers from ProRAT:-
  1. First thing you need do is reboot the computer in Safe Mode with Networking to avoid Trojan Prorat from loading at start-up.
  2. Remove all media such as floppy drive, cd, dvd, and USB devices. Then, restart the computer.
  3. Once Windows is running under Safe Mode with Networking, open your antivirus program and download the most recent update. This method ensures that your antivirus program can detect even newer variants of Trojan Prorat.
  4. Once updating is finished, run a full system scan. After the scan, delete all infected items. If unable to clean or delete, better place the threat in quarantine.
  5. In future, try not to click or open unknown files or links.

Saturday, 17 January 2015

HB Blog 53: Open Systems Interconnection Model (OSI Model).

 We usually never try to think on the communication system and how it actually works at root level.
We are so surrounded with communication systems that personally I feel it has become 4 basic need
of human being. It sounds bit boring to read and learn or can say study. But I feel as a user of this system
I would brief out one model know as OSI model of communication system.

The Open Systems Interconnection model (OSI) is a conceptual model that characterizes and standardizes the internal functions of a communication system by partitioning it into abstraction layers. The recommendation X.200 describes seven layers, labeled 1 to 7. Layer 1 is the lowest layer in this model.
The internal data communication between this layers can be describe by below diagram.

Layer 1: physical layer
It defines the electrical and physical specifications of the data connection. It defines the relationship between a device and a physical transmission medium (e.g., a copper or fiber optical cable). This includes the layout of pins, voltages, line impedance, cable specifications, signal timing, hubs, repeaters, network adapters, host bus adapters (HBA used in storage area networks) and more.It defines the protocol to establish and terminate a connection between two directly connected nodes over a communications medium.

Layer 2: data link layer
The data link layer provides node-to-node data transfer -- a reliable link between two directly connected nodes, by detecting and possibly correcting errors that may occur in the physical layer. The data link layer is divided into two sublayers:
    Media Access Control (MAC) layer - responsible for controlling how devices in a network gain access to data and permission to transmit it.
    Logical Link Control (LLC) layer - controls error checking and packet synchronization.

Layer 3: network layer
The network layer provides the functional and procedural means of transferring variable length data sequences (called datagrams) from one node to another connected to the same network. It translates logical network address into physical machine address.

Layer 4: transport layer
The transport layer provides the functional and procedural means of transferring variable-length data sequences from a source to a destination host via one or more networks, while maintaining the quality of service functions.The transport layer controls the reliability of a given link through flow control, segmentation/desegmentation, and error control.

Layer 5: session layer
The session layer controls the dialogues (connections) between computers. It establishes, manages and terminates the connections between the local and remote application. It provides for full-duplex, half-duplex, or simplex operation, and establishes checkpointing, adjournment, termination, and restart procedures.

Layer 6: presentation layer
The presentation layer establishes context between application-layer entities, in which the application-layer entities may use different syntax and semantics if the presentation service provides a big mapping between them.This layer provides independence from data representation (e.g., encryption) by translating between application and network formats. The presentation layer transforms data into the form that the application accepts. This layer formats and encrypts data to be sent across a network.

Layer 7: application layer
The application layer is the OSI layer closest to the end user, which means both the OSI application layer and the user interact directly with the software application. This layer interacts with software applications that implement a communicating component.