Showing posts with label Root. Show all posts

Sunday, 6 August 2023

Unlocking the Potential: Weighing the Pros and Cons of Jailbreaking or Rooting Your Mobile Device.

 In today's tech-savvy world, smartphones have become an indispensable part of our lives, offering a wide array of features and functionalities. However, some users seek even more control and customization over their devices, leading them to explore the world of jailbreaking (for iOS devices) or rooting (for Android devices). While these practices provide users with additional freedom, they also come with potential risks and drawbacks. In this blog, we'll explore the pros and cons of jailbreaking or rooting your mobile device, helping you make an informed decision.

What is Jailbreaking or Rooting?

Jailbreaking (for iOS devices) and rooting (for Android devices) are procedures that remove restrictions imposed by the operating system, granting users administrative access to the device's file system and allowing them to run custom software or modify system settings. This process essentially liberates your device from the manufacturer's limitations, giving you greater control over its functionality.

Pros of Jailbreaking or Rooting

  • Enhanced Customization: Jailbreaking or rooting grants users access to the device's core system files, enabling them to customize their devices extensively. Users can install themes, custom fonts, and tweak the user interface to their liking, giving their smartphones a unique and personalized look and feel.
  • Access to Unofficial Apps: The official app stores, such as Apple's App Store and Google Play Store, have strict guidelines that sometimes lead to the rejection of certain apps. By jailbreaking or rooting, users can access third-party app repositories, offering a wide range of apps and tweaks not available in official stores. This opens up a world of possibilities and experimentation.
  • Removal of Bloatware: Manufacturers often pre-install unwanted apps, commonly known as bloatware, on mobile devices. Jailbreaking or rooting allows users to uninstall or disable these pre-installed applications, freeing up valuable storage space and potentially improving device performance.
  • System Tweaks and Improvements: With jailbreaking or rooting, users can apply system-level tweaks and improvements that can optimize device performance, enhance battery life, and even overclock the CPU for better processing power.
  • Advanced Backup and Restore: Jailbreaking or rooting provides users with the ability to create full system backups, enabling easy restoration in case of software issues or data loss. This is especially beneficial for advanced users who frequently experiment with their devices.

Cons of Jailbreaking or Rooting

  • Voiding Warranty and Security Risks: Jailbreaking or rooting your device typically voids the warranty provided by the manufacturer, leaving users with no official support for hardware and software issues. Additionally, by accessing core system files, users expose their devices to potential security risks, including malware and unauthorized access.
  • Stability and Performance Issues: Modifying the device's operating system can lead to stability and performance problems. Users might encounter frequent crashes, freezes, or battery drainage, especially if they install poorly optimized or incompatible software.
  • Software Incompatibility: As manufacturers continuously update their devices and operating systems, jailbreaking or rooting might make your device incompatible with the latest software updates. This means you could miss out on crucial security patches and exciting new features.
  • Reduced Device Lifespan: Due to potential software complications and increased vulnerability to malware, jailbroken or rooted devices might experience a reduced lifespan. Constant tweaking and experimentation can accelerate wear and tear on the hardware.
  • Legal Implications: In some regions, jailbreaking or rooting your mobile device might be considered illegal or against the terms of service of the manufacturer or carrier. Users should be aware of the legal implications in their specific jurisdiction before attempting such modifications.

Precautions and Steps to Jailbreak or Root:
  • Backup: Before attempting any modification, back up your device to safeguard your data.
  • Research: Find a reputable and reliable guide specific to your device and software version. Follow the steps meticulously and ensure you understand each action you take.
  • Use Trusted Sources: Download jailbreak or rooting tools from trustworthy sources to reduce the risk of malware infection.
  • Security Software: Install reputable security software to protect your device from potential threats.
Post-Jailbreak/Rooting:
  • Be Selective: Exercise caution when installing third-party apps and tweaks. Stick to trusted sources to minimize security risks.
  • Regular Updates: Keep your device's software up-to-date, even if it means losing root access temporarily. This will ensure you have the latest security patches.
  • Revoke Root Access: If needed, you can reverse the jailbreak or root process to restore your device's original state.

Conclusion

Jailbreaking or rooting your mobile device can provide a thrilling and liberating experience, granting you unprecedented control over your smartphone. Enhanced customization, access to unofficial apps, and the ability to remove bloatware are alluring benefits that many users find attractive. However, the risks associated with voiding the warranty, security concerns, and potential software issues cannot be ignored.

Ultimately, the decision to jailbreak or root your mobile device should be made with caution and careful consideration of the potential consequences. If you're an advanced user who values customization and is willing to take on the associated risks, proceed with care and be mindful of the potential drawbacks. For the average user, sticking with the official operating system is likely the safer and more convenient option. Always remember that the responsibility lies with the user, and staying informed about the risks and benefits is crucial in making a well-informed decision for your mobile device.

Sunday, 11 October 2015

HB Blog 97: Jailbreaking Using Pangu - A Jailbreak Utility.

Jailbreaking is a form of privilege escalation, and the term has been used to describe privilege escalation on devices by other manufacturers as well. It is the process of removing hardware restrictions on iPhone, it through the use of software and hardware exploits. It permits root access to the iOS file system and manager, allowing the download of additional applications, extensions, and themes that are unavailable through official package.
Reasons for jailbreaking: -
  1. Device customization
  2. Use of handset on multiple carriers
  3. Installation of malware(Hacking tools)
  4. and many more
Steps to Jailbreak an iPhone: -
  1. Download a free jailbreak utility released by the Pangu jailbreak developers.
  2. Connect your iPhone to your computer using the USB cable. Tap "Trust" on your iPhone if prompted. This will appear if you are connecting your iPhone for the first time.
  3. You will need to make a backup in iTunes and check to ensure that you are running the latest version. This will allow you to restore your settings after jailbreaking.
  4.  Start Pangu on your computer and connected iPhone will be displayed in the Pangu window.
  5. Click "Jailbreak" in the Pangu window and the jailbreaking process will begin.
  6. This could take up to 20 minutes or more. Do not touch your iPhone or unplug it during the jailbreak process. Your iPhone will reboot after the jailbreak is complete. The reboot will take longer than normal, so don't be alarmed.
  7. Launch Cydia which is the package manager for jailbroken iPhones. You will need to run it as soon as the jailbreak is complete to finish setting up your filesystem. Your iPhone will reboot again after configuring Cydia.
  8. Launch Cydia again and tap the "Changes" tab.
  9. Now that your device is fully jailbroken, you can restore your backup to retrieve your settings and data without losing your jailbreak.
Comparison iPhone jailbreaking to Android rooting:-
Jailbreaking of iOS devices is sometimes compared to "rooting" of Android devices. Although the two concepts both involve privilege escalation, they differ substantially in scope. Android devices, with few exceptions, do not natively implement strong technical security measures to prevent users from modifying or replacing the operating system, enabling installation of apps that have not been reviewed or authorized by a central authority such as Google - known as "sideloading" - is a simple user preference.

Friday, 4 September 2015

HB Blog 92: ProRAT - Remote Administration Tool.

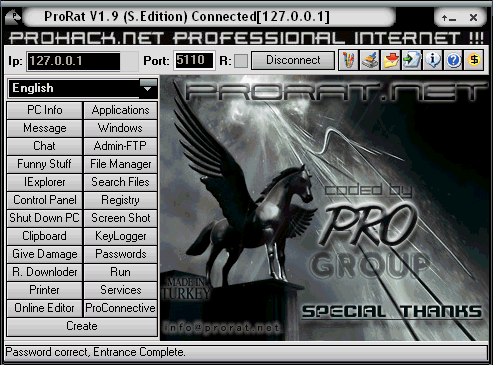
ProRat is a Remote Administration Tool made by PRO Group. It was written in C programming language and its capable to work with all windows operating systems. It is made for remoting your own computers from other computers. It is a Microsoft Windows based backdoor trojan horse, more commonly known as a RAT (Remote Administration Tool). As with other trojan horses it uses a client and server. It opens a port on the computer which allows the client to perform numerous operations on the server (the machine being controlled).
Features of ProRAT:-
ProRat allows many malicious actions on the victim's machine. Some of its abilities include:
    Logging keystrokes
    Full control over files
    Drive formatting
    Open/close CD tray
    Hide taskbar, desktop, and start button
    Writing on-screen
    Movement of cursor
    Feed the cat
    Take screenshots
    View system information
    View webcam
    Download & run files
    Password Protect your bound server from being used by anyone else
It also has a server creator which features that allow it to be undetected by antivirus and firewall software, and also allow it to stealthily run in the background.

How to remotely control computers using ProRAT: -
  1. Download ProRat. Once it is downloaded right click on the folder and choose to extract it, antivirus will detect it as trojan but it is a false positive detection. Open up the program.
  2. Next create the actual Trojan file. Click on Create and choose Create ProRat Server.
  3. Next put in your IP address so the server could connect to you. If you don’t know your IP address click on the little arrow to have it filled in for you automatically. Next put in your e-mail so that when and if a victim gets infected it will send you a message.
  4. Click on the General Settings button to continue. Choose the server port the program will connect through, the password you will be asked to enter when the victim is infected and you wish to connect with them, and the victim name. You can see ProRat has the ability to disable the windows firewall and hide itself from being displayed in the task manager.
  5. Click on the Bind with File button to continue. Here you will have the option to bind the trojan server file with another file. Remember a trojan can only be executed if a human runs it. So by binding it with a legitimate file like a text document or a game, the chances of someone clicking it go up. Check the bind option and select a file to bind it to.
  6. Click on the Server Extensions button to continue. Choose what kind of server file togenerate. Mostly exe’s looks suspicious so it would be smart to change it. Click on Server Icon to continue. Here you will choose an icon for your server file to have. The icons help mask what the file actually is.
  7. Finally click on Create Server to, you guessed it, create the server file.
  8. Once the trojan runs on victims computer the attacker would then get a message telling him that victim was infected. He would then connect to computer by typing in my IP address, port and clicking Connect. He will be asked for the password that he made when he created the server. Once he types it in, he will be connected to victims computer and have full controlover it.
How to protect/secure computers from ProRAT:-
  1. First thing you need do is reboot the computer in Safe Mode with Networking to avoid Trojan Prorat from loading at start-up.
  2. Remove all media such as floppy drive, cd, dvd, and USB devices. Then, restart the computer.
  3. Once Windows is running under Safe Mode with Networking, open your antivirus program and download the most recent update. This method ensures that your antivirus program can detect even newer variants of Trojan Prorat.
  4. Once updating is finished, run a full system scan. After the scan, delete all infected items. If unable to clean or delete, better place the threat in quarantine.
  5. In future, try not to click or open unknown files or links.

Wednesday, 5 August 2015

HB Blog 87: Android Root Equivalent Vulnerabilities Detected And Fixed.

In computer security, a vulnerability is a weakness which allows an attacker to reduce a system's information assurance. Vulnerability is the intersection of three elements: a system susceptibility or flaw, attacker access to the flaw, and attacker capability to exploit the flaw. To exploit a vulnerability, an attacker must have at least one applicable tool or technique that can connect to a system weakness. In this frame, vulnerability is also known as the attack surface.
Many root equivalent vulnerabilities are found in Android which could exploit an application. This means vulnerabilities which allow an application (malicious or compromised) to either directly gain root or gain privileges which can then be used to obtain root. Below, I have listed few android vulnerabilities that are detected and fixed with there basic descriptions,

Name:- dhcpd buffer overrun.
Root Category:- Network.
Description:- The specific flaw exists within the parsing of the DHCP options in a DHCP ACK packet. The vulnerability is triggered when the LENGTH of an option, when added to the current read position, exceeds the actual length of the DHCP options buffer. An attacker can leverage this vulnerability to execute code on the device. This remote code execution vulnerability executes code as the dhcp user which limit's its severity.

Name:- TowelRoot.
Root Category:- Network.
Description:- The futex_requeue function in kernel/futex.c in the Linux kernel through 3.14.5 does not ensure that calls have two different futex addresses, which allows local users to gain privileges via a crafted FUTEX_REQUEUE command that facilitates unsafe waiter modification.

Name:- Defy republic init_runit.
Root Category:- Permissions.
Description:- A certain configuration of Android 2.3.7 on the Motorola Defy XT phone for Republic Wireless uses init to create a /dev/socket/init_runit socket that listens for shell commands, which allows local users to gain privileges by interacting with a LocalSocket object. Stack-based buffer overflow in the sub_E110 function in init in a certain configuration of Android 2.3.7 on the Motorola Defy XT phone for Republic Wireless allows local users to gain privileges or cause a denial of service (memory corruption) by writing a long string to the /dev/socket/init_runit socket that is inconsistent with a certain length value that was previously written to this socket.

Name:- Qualcomm chown init scripts.
Root Category:- Permissions.
Description:- Insecure owner/permission changes in init shell scripts: During the device start-up phase, several init shell scripts are executed with root privileges to configure various aspects of the system. During this process, standard toolchain commands such as chown or chmod are used to, e.g., change the owner of the sensor settings file to the system user. As these commands follow symbolic links (symlinks), an attacker with write access to these resources is able to conduct symlink attacks and thus change for example the owner of an arbitrary file to system. This flaw can be used to, e.g., elevate privileges.

Name:- APK duplicate file.
Root Category:- Signature.
Description:- Android does not properly check cryptographic signatures for applications, which allows attackers to execute arbitrary code via an application package file (APK) that is modified in a way that does not violate the cryptographic signature.

Name:- Fake ID.
Root Category:- Signature.
Description:- The software does not properly validate an application's certificate chain. An application can supply a specially crafted application identity certificate to impersonate a privileged application and gain access to vendor-specific device administration extensions. The vulnerability resides in the createChain() and findCert() functions of the Android JarUtils class.
Name:- RageAgainstTheCage adb.
Root Category:- System.
Description:- adb fails to check setuid return code and this can be caused to fail by the shell user already having RLIMIT_NPROC processes.

Name:- keystore buffer.
Root Category:- System.
Description:- Stack-based buffer overflow in the encode_key function in /system/bin/keystore in the KeyStore service in Android 4.3 allows attackers to execute arbitrary code, and consequently obtain sensitive key information or bypass intended restrictions on cryptographic operations, via a long key name.

Name:- Qualcomm Gandalf camera driver..
Root Category:- Kernel.
Description:- The camera driver provides several interfaces to user space clients. The user space clients communicate to the kernel via syscalls such as ioctl or mmap. The camera driver provides an uncontrolled mmap interface that allows an application with access to the device file to map physical memory exceeding the camera driver's memory into user space. A locally installed, unprivileged application can use this flaw to escalate privileges.

Name:- Qualcomm out of bounds camera.
Root Category:- Kernel.
Description:- The camera driver provides an ioctl system call interface to user space clients for communication. When processing this communication, the msm_ioctl_server, msm_server_send_ctrl, and msm_ctrl_cmd_done functions use a user-supplied value as an index to the server_queue array for read and write operations without any boundary checks. A local application with access to the camera device nodes can use this flaw to, e.g., elevate privileges.

Saturday, 8 November 2014

HB Blog 35: Android Applications For Rooted Devices.

1) Linux Deploy
Click here to download : Google Play Store
Description : This application is open source software for quick and easy installation of the operating system (OS) GNU/Linux on your Android device.The application creates a disk image on the flash card, mount it and install there OS distribution.
2) Root Checker
Click here to download : Google Play Store
Description : The goal of this application is to provide even the newest Android user with a simple method to check their device for root (administrator/superuser) access. This is a very simple application to notify the user whether or not they have properly setup root access.
3) Titanium Backup
Click here to download : Google Play Store
Description : Titanium Backup is the most powerful backup tool on Android.You can backup, restore, freeze (with Pro) your apps + data + Market links.
4) Superuser
Click here to download : Google Play Store
Description : Superuser is the app that manages what apps on your rooted device have access to su. Apps that are granted su have elevated permissions and can modify just about any part of the system.
5) ROM Toolbox Pro
Click here to download : Google Play Store
  
Description : ROM Toolbox combines all the great root apps into one monster app with a beautiful and easy to use interface. ROM Toolbox has every tool you need to make your Android device fast and customized to your liking.ROM Toolbox combines apps like Titanium Backup, ROM Manager, Root Explorer, SetCPU, MetaMorph, Autorun Manager, Terminal Emulator, Script Manager, SD Booster, BuildProp Editor, Font Installer, Boot Animation Installer & many more apps into an all-in-one app.

Saturday, 1 November 2014

HB Blog 31: How To Install Windows XP On Android Device.

Windows XP is a personal computer operating system produced by Microsoft as part of the Windows NT family of operating systems. 
Requirements:- 
  1. A smartphone/tablet running Android with RAM more than 1000MB and hardware specification, which needs to be rooted since it requires root permission to run certain scripts.For rooting android smartphone you can follow my blog Step By Step Guide How To Root Mobile Device.
  2. Download and Install Bochs for your Android.Click here
  3. Download SDL.zip.Click here
  4. Download and Install Qemu Manager for you PC.Click here
  5. Blank Disk .IMG.
Installation:- 
1)Create a blank image file in Bochs on your PC and for that what you have to do is that go to Start and open up Bochs> and then Disk image creation tool and then the new tab with black screen appears as shown below.
In that you have to type 
hd 
flat and it will ask the size
type 1500 and
then type in c.img and then press the enter key.
2)Install Windows XP on blank .img file using Qemu manager, then open up the Qemu manager.
After opening up the Qemu manager, click on the VM on the top left side and select new virtual machine.Then a sub tab appears as shown in the image and type out any name that you need in the first box and hit next.Now in the new tab you can locate the desired RAM that you want to change and change it to 1 Giga hertz and hit finish. Now install XP to your blank image file.Then, click on drives on the left top side and find out the c.img file from the drives. Usually the c.img file will be seen at the C drive> Program files > flash > and change view to all files and your c.img file will be seen select the file and click Okay.
3)Find out the Window XP.iso file and click Ok. If you don't have iso file then you need to download a software called Poweriso and you can convert it to ISO file. After selecting the iso file click on the run button on the top left side which is of green color and the system changes to a blue screen.
After changing the screen to blue color and loading would take few minutes depending on how fast is your computer.Wait till the loading finishes and after that start the installation and a couple of options comes out choose from. Choose ntfs file system and then the installation will take place and it will take few minutes to complete.
4)When the installation is finished, stop the virtual machine. And then, find the c.img file and transfer it to phone. For that find out the c.img file from the local disk and copy the file and paste the file in the SDL folder on the SD card. And after that copy the code given and paste it in the boch.txt file in the SDL folder on the SD card. 
Code:
megs: 256
cpu: count=1, ips=6000000, reset_on_triple_fault=1, ignore_bad_msrs=1
# filename of ROM images
romimage: file=BIOS-bochs-latest
vgaromimage: file=VGABIOS-lgpl-latest
vga: extension=cirrus, update_freq=25
pci: enabled=1, chipset=i440fx, slot1=cirrus
ata0: enabled=1, ioaddr1=0x1f0, ioaddr2=0x3f0, irq=14
ata1: enabled=1, ioaddr1=0×170, ioaddr2=0×370, irq=15
ata0-master: type=disk, path=”c.img”
#ata0-slave: type=disk, path=”d.img”
#ata1-master: type=disk, mode=vvfat, path=/sdcard/HDD, journal=vvfat.redolog
#type=cdrom, path=”CD.ISO”, status=inserted
boot: c
config_interface: textconfig
#display_library: x
# other choices: win32 sdl wx carbon amigaos beos macintosh nogui rfb term svga
log: bochsout.txt
sb16: enabled=1
mouse: enabled=1
sb16: wavemode=1, dmatimer=500000
clock: sync=none, time0=1

Now, turn on your phone and take out the application Bosh which has been installed on your device. Actually it takes few minutes to load up XP on the Android device.
Enjoy the hack :)

Also See:-
How To Install Backtrack On Android Device.
How To Install Kali Linux On Android Device Using Linux Deploy. 

Tuesday, 7 October 2014

HB Blog 27: How To Install Kali Linux On Android Device Using Linux Deploy.

From the creators of BackTrack comes Kali Linux, the most advanced and versatile penetration testing distribution ever created.
Linux in a chroot on almost any modern device that runs Android. In fact, the developers of Linux Deploy have made it extremely easy to get any number of Linux distributions installed in a chroot environment using a simple GUI builder. 

Requirements:-
  1.  A smartphone/tablet running Android 2.1 and above, which needs to be rooted since it requires root permission to run certain scripts.
    For rooting android smartphone you can follow my blog Step By Step Guide How To Root Mobile Device.
  2. At least 5 GB free space on internal or external storage.
  3. A fast, wireless internet connection.
  4. Patience to wait for a distribution to bootstrap from the network. 
  5. Following Android Apps:
    BusyBox: It acts like a installer and uninstaller.it needs root permission to run.it has gpu cores and can  run linux kernals on android .
    Superuser: This app just grants a superuser power to your phone just like “su” does for linux.
    Terminal Emulator: It is app that runs a terminal console in android .
    AndroidVNC: It is a tool for viewing VNC in Android.
    Linux Deploy:It creates a disk image on the flash card, mount it and install there OS distribution.
Installation:-
1)Start up Linux deploy app and press the little arrow in the bottom right corner of the screen to open the preferences menu.
2)Configuring the settings as per your requirements.You can choose your architecture, verify that the Kali mirror is correct, set your installation type and location on your Android device, etc.
 3)Then, select "install" option and start installing Linux to your device.It will start a Kali Linux bootstrap directly from our repositories. Depending on your Internet connection speed, this process could take a while. You’ll be downloading a base install of Kali Linux (with no tools) at minimum.
4)After installed go back to preferences and select reconfigure. This will take a couple minutes but will configure Kali with your device.
5)Then just hit "start" option and Linux Deploy automatically mounts and loads up your Kali Linux chroot image. This also includes the starting of services such as SSH and VNC for easier remote access.
6)At this stage, Linux Deploy has started a VNC and SSH server inside your chrooted Kali image. You can connect to the Kali session remotely using the IP address assigned to your Android device.To bring up the graphical interface to see it.Select android vnc viewer and put in these settings. Select new for connection, type anything you want for the nickname, type changeme as the password, and 5900 as port. Now u could use any color settings but the best would be 24-bit. After you fill this out select connect.
 
7)Press Connect and thats all kali is running, when your finished just go back to Linux deploy app and select stop. 

Monday, 6 October 2014

HB Blog 26: How To Install Backtrack On Android Device.

BackTrack was a Linux distribution that aimed at digital forensics and penetration testing use.BackTrack provided users with easy access to a comprehensive and large collection of security-related tools ranging from port scanners to Security Audit.

But, this post is not about backtrack on pc, this is about backtrack on android device.
How To Install Backtrack On Android Device???

Requirements:-
1.Backtrack 5 Arm architecture.
2.A smartphone/tablet which needs to be rooted since it requires root permission to run certain scripts.
For rooting android smartphone you can follow my blog Step By Step Guide How To Root Mobile Device.
3.Following Android Apps:
BusyBox: It acts like a installer and uninstaller.it needs root permission to run.it has gpu cores and can  run linux kernals on android .
Superuser: This app just grants a superuser power to your phone just like “su” does for linux.
Terminal Emulator: It is app that runs a terminal console in android .
AndroidVNC: It is a tool for viewing VNC in Android.

Installation:-
1.Extract the backtrack folder "BT5-GNOME-ARM" to folder named "BT5" on the root of SD card. That’s the top level of the SD card.
2.Open up the Terminal Emulator.
3.Type the command 
cd sdcard/BT5.
4.Run this command and you will see root@localhost.
su   
sh bootbt
5. Now run Backtrack GUI with VNC viewer.
startvnc
6. Open android vnc
Nickname : BT5
Password : toortoor
Address : 127.0.0.1
Port : 5901
7. Connect it and you will see Backtrack 5 interface.

Wednesday, 1 October 2014

HB Blog 23: Step By Step Guide How To Root Mobile Device.

What is Rooting Android Devices? Heard as, "device should be rooted". 
Rooting is a process that allows you to attain root access to the Android operating system code (the equivalent term for Apple devices id jail breaking). It gives you privileges to modify the software code on the device or install other software that the manufacturer wouldn’t normally allow you to.

I will show a very basic tutorial for rooting the android mobile device. But, before that I prefer to clear out the advantages as well as disadvantages for rooting the device.
Advantages:-
  1. Install Custom ROM on your device to add themes and change look and feel.
  2. Backing up device data using Apps such as Titanium backup, Astro, etc.
  3. Access Apps and Games that requires root support.
  4. Removing unwanted Apps and Games.
  5. Install Applications on SD Card.
Disadvantages:-
  1. It may result into bricking(damaging/corrupting) the software of the device. Solution - Sp tools is a tool with which you can flash new firmwares or recoveries. Or fix your Phone if it is soft bricked. 
  2. It will void your warranty. Solution - You can always get your warranty back by unrooting your device.
  3. Malware can easily breach your mobile security.
    Solution -  Have a good paid anti-virus. Thats all, I can say on this.
Step By Step Guide How To Root Mobile Device:-
Step 1 : Plug in and connect your android device to your computer via USB and it will initiate driver installation for the device. Install them. Skip this if you have done this already before.
Step 2 : Unplug and re-connect, but this time select "Charge only" to sure that your phone’s SD Card in not mounted to your PC during the rooting process.

Step 3 : Put your android into USB Debugging mode. Go to Settings > Applications > Development and enable USB Debugging. This will enable SuperOneClick to root your android device by running the exploit from your PC while connected via USB.
Check all the steps. All drivers should be installed. You SD card must be un-mounted and USB Debugging must be enabled 
Step 4 : Download superoneclick software from below link,
Download SuperOneClick
Step 5 : Open the superoneclick folder you’ve downloaded and run SuperOneClick.exe file. You will see the window (below). Click on the "Root" button. And if everything goes well you will get OK messages a lot.
 Step 6 : It takes just a minute. And after its done you will see a "Running a Su test Success!" which means the rooting process is completed. Go to your phone app drawer and you will see Superuser icon which means you now have root access. (reboot the phone if you don’t see it).
Superuser is a small utility that manges access to the root permissions, kind of like a gate keeper. It makes sure that applications can’t make changes to your device without asking you first.

Its done, enjoy the hack. :)